
Skiplist是一种数据结构,它允许快速查询一个有序连续元素的数据链表,跳跃列表的平均查找和插入时间复杂度都是O(logn),优于普通队列的O(n),Skiplist被用在Redis、LevelDb中;
本文首先讲解了Skiplist,随后给出了Rust实现;
源代码:
- https://github.com/JasonkayZK/boost-rs/blob/main/boost-rs/src/collection/linkedlist.rs
- https://github.com/JasonkayZK/boost-rs/tree/main/boost-rs/src/collection/skiplist
关联文章:
使用Rust实现跳表Skiplist
Skiplist原理
Skiplist结构
关于Skiplist的原理,这篇文章讲的非常清楚:
这里为了方便下文讲述,进行了部分引用;
跳表(Skip List)是由 William Pugh 发明的一种动态数据结构,支持对数据的快速查找,插入和删除;
并且跳表的各方面性能都十分优秀,甚至可以媲美红黑树,跳表本身是对有序链表的改进;
首先,让我们先回顾一下链表:

上图是一个有序链表,在链表中的查找、插入以及删除操作的时间复杂度均为O(N);
跳表设计的理念就是:在有序链表的基础上,引入“索引”的概念,即:每两个节点提取一个节点到上一级,抽出来的那一级叫做索引层;
如此一来,查找一个值,最坏情况下总共需要考察 (n/2)+1 个节点;
具体的查找方法是:从左上角的节点出发,向右考察每个节点,如果右边节点比目标值小, 则继续向右,否则,进入下一层继续,直到最底层;
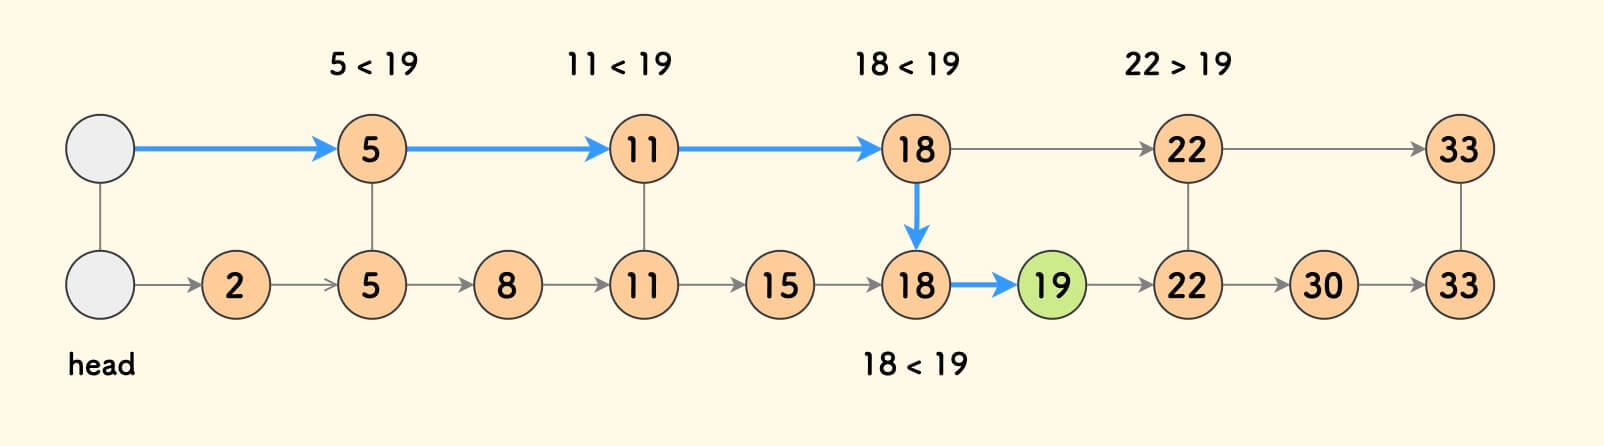
沿着这一思路,再每隔一个节点,搭一条线, 此时,查找一个元素最多需要考察 (n/4)+2 个节点!
可以推测,盖楼达到 k 层时,查找目标需要考察 2^−k+k个节点;
直到,没有节点可以继续盖楼;
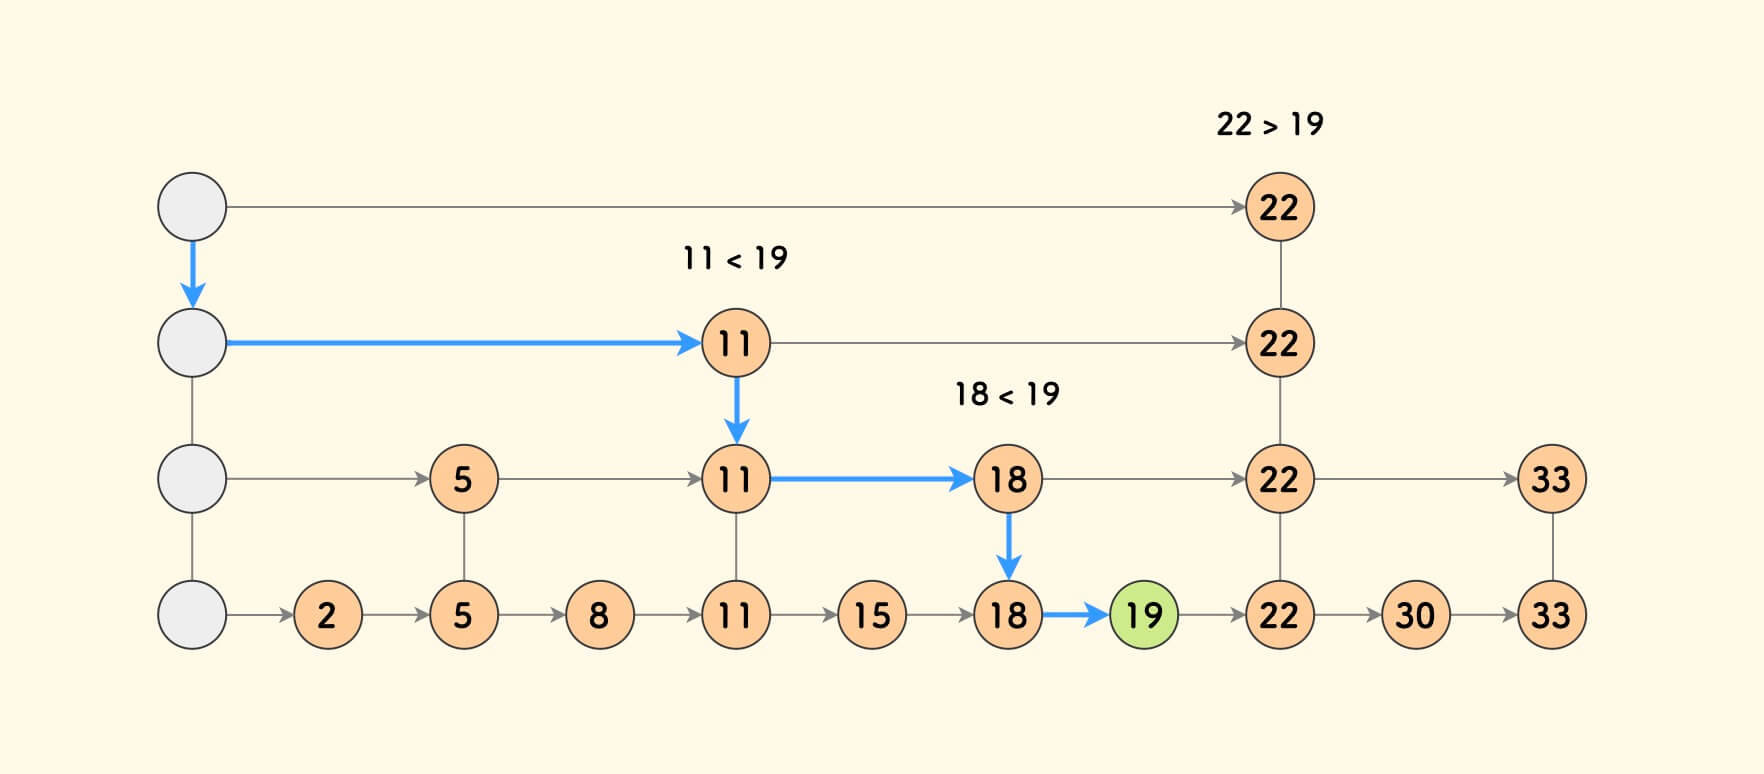
在 n 足够大的时候,考察次数 2^−k+k 近似为 k ,即 log(n), 所以在这个思路下,查找的时间复杂度,从 O(n) 降低为了 O(logn);
由于链表不像数组,不支持直接通过 index 定位到某个元素,因此需要增加链接来实现类似于数组中二分的效果!
像上面我们描述的,这种链表加上多级索引的数据结构,就是跳表;
Skiplist构建(随机化)
在实际实现时,跳表的结构更像是下面这样的:
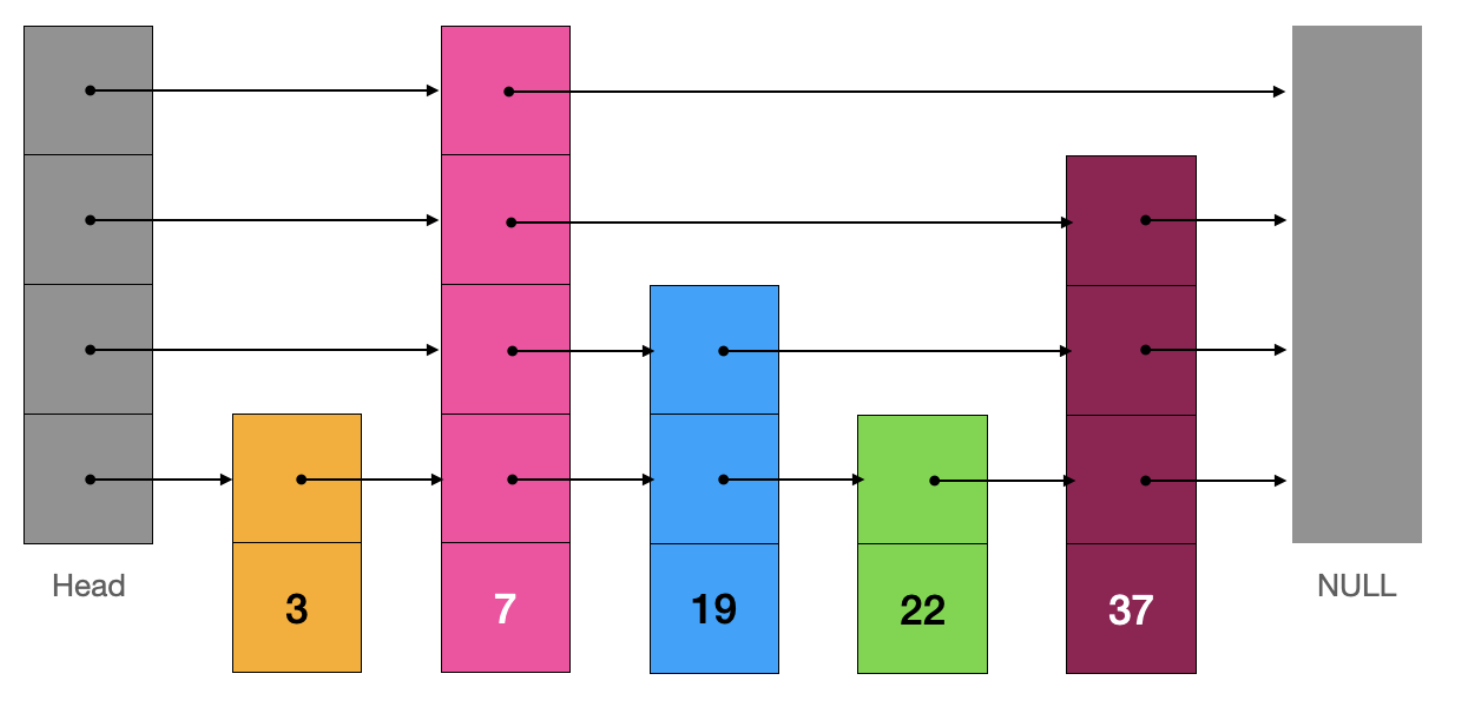
跳表中的节点 Node 除了存储元素值 e 以外,还要存储一个数组 Node[] next 来保存索引信息;
在“真实的”跳表中:每个节点的“索引”在“索引层”的分布并不是均衡的,各个节点的“索引高度”也是参差不齐(索引高度就是 next.length);
这是因为:想要维护一个层与层之间,从下层的每两个节点抽取出一个放在上层的完美结构几乎是不可能的!即便维持了那样的结构,提升了查找元素的效率,要向跳表中添加或删除一个元素,索引层就要重新调整,这个过程的开销将会是巨大的!
那么,该如何确定一个节点的“索引高度”呢?
- 既要保证跳表索引大小与数据大小的平衡性,如果每个节点的“索引高度”过低,跳表的性能就会严重退化;
- 也要保证跳表各个节点的“索引高度”的平衡性,如果每个节点的“索引高度”几乎一致,那么性能也会严重退化;
为了解决这个问题,跳表通常都使用了随机数发生器(random number generator)来生成“索引高度”!
一个随机数生成器的代码用例如下:
private int generateRandomLevel() {
    int level = 1;
    for (int i = 1; i < MAX_LEVEL; i++) {
        if (random.nextInt() % 2 == 1) {
            level++;
        }
    }
    return level;
}方法中,MAX_LEVEL 表示 Skiplist 中定义的索引的最大高度,因为在阶数比较大之后,盖更高的楼对查找时间的优化作用会越来越小, 考虑到内存占用因素,实践中常限定一个最高阶数;
同时,函数通过随机的方式来生成当前节点的层数:
这个函数可以理解为不断抛硬币的过程:每次抛硬币,有一半的概率可以再抛一次,那么最终抛 k 次的概率就是 1/(2^k);
在平均情形下,第 k 层的节点大约有 n/(2^k) 个,且每一层的节点预期分布大致均匀, 相比原来非随机化的情况,查找一个目标的平均时间复杂度并无变化,仍然是 O(logn);但是插入一个新元素则却变简单了,不必繁琐地维护严格的 “间隔搭线” 的规则!
是不是这个实现非常有创意?
不过, 跳跃表并不提供对最坏情形的性能保证,因为并不能排除非常小的概率下会生成一个极不平衡的跳跃表;
那时,查找一个元素的时间将退化为 O(n)!
实现
由于Skiplist的实现依赖双向链表,而在Rust中实现双向链表并非一个简单的内容;
因此在阅读下面的实现前,强烈建议先阅读我的这篇文章:
结构定义
单个节点SkipNode
跳表中单个节点 SkipNode 的定义如下:
pub(crate) type Link<T> = Option<NonNull<SkipNode<T>>>;

#[derive(Clone, Debug)]
pub(crate) struct SkipNode<T> {
    // item should never be None, unless the node is a head.
    pub(crate) val: Option<T>,

    // how high the current node reaches.
    pub(crate) level: usize,

    // Vector of links to the next node at the respective level. This vector
    // *must* be of length `self.level + 1`.  links[0] stores a pointer to the
    // next node, which will have to be dropped.
    pub(crate) next: Vec<Link<T>>,
}

impl<T> SkipNode<T> {
    /// Create a new head node.
    pub fn head(level_bound: usize) -> Self {
        SkipNode {
            val: None,
            level: level_bound - 1, // The head node has `level_bound-1` levels(highest level)
            next: iter::repeat(None).take(level_bound).collect(),
        }
    }

    /// Create a new SkipNode with the given item..
    /// All pointers default to null.
    pub fn new(item: T, level: usize) -> Self {
        SkipNode {
            val: Some(item),
            level,
            next: iter::repeat(None).take(level + 1).collect(),
        }
    }

    pub fn into_val(self) -> Option<T> {
        self.val
    }
}
这里定义的节点:
- 既有可能是每一层的头节点(不存实际数据),此时 val 为 None;
- 也有可能是中间节点,此时 val 和 next 一定都不为空;
- 还有可能是尾节点,此时 next 为空;
对于
Option<NonNull<SkipNode<T>>>的结构形式,看过双向链表实现的都不会疑惑,这里简单说一下为什么要用裸指针:由于在 Skiplist 中的多个层都存在指向下一个节点的指针,因此在修改时不可避免的会存在节点的可变引用和多个不可变引用,所以需要使用 unsafe 来手动管理,所以需要使用裸指针;
level 字段定义了当前节点的层数;对应的,next 字段中存放了当前节点指向的下一个节点;
需要注意的是:和前面的介绍相对应的,next[0] 中存放了实际的节点,其他层只是存放下一个节点的指针(虽然存放的类型是一样的);释放空间时,只需释放 next[0] 的空间即可,否则会 double free!
对于方法:
- head:创建一个头节点;
- new:创建一个中间节点;
逻辑非常简单,不再赘述;
跳表结构OrdSkipList
跳表 OrdSkipList 的定义如下:
/// The inner comparator in skiplist
type Comparator<T> = Box<dyn Fn(&T, &T) -> Ordering>;

pub struct OrdSkipList<T> {
    length: usize,
    head: NonNull<SkipNode<T>>,
    cmp: Comparator<T>,
    level_generator: Box<dyn GenerateLevel>,
    _marker: PhantomData<Box<SkipNode<T>>>,
}
由于跳表是一个有序的结构,因此:我们定义了 Comparator<T> = Box<dyn Fn(&T, &T) -> Ordering> 类型用于自定义比较顺序,这个比较顺序也决定了 Skiplist 底层的存储;
OrdSkipList 中定义了:
length:当前跳表中存储的元素个数;head:跳表头节点,包含了MAX_LEVEL个指向下一层的节点;cmp:比较函数,用于指定跳表中的比较顺序;level_generator:节点层数生成器,和前面的随机化内容对应,可以是任意实现了 GenerateLevel Trait 的对象;_marker:用于什么我们的 OrdSkipList 对 SkipNode 类型的所有权;
层数生成器LevelGenerator
前面说到,在向跳表中加入新节点时,要按照概率随机生成这个节点的层数,这个生成器在 OrdSkipList 的 level_generator 中使用;
为了提高灵活性,level_generator 可以是任何实现了 GenerateLevel Trait 的对象;
GenerateLevel Trait 定义如下:
boost-rs/src/collection/skiplist/level_generator.rs
/// Upon the insertion of a new node in the list, the node is replicated to high
/// levels with a certain probability as determined by a `LevelGenerator`.
pub trait GenerateLevel {
    /// The max number of levels that are assumed to exist for this level
    /// generator.
    /// MAX_LEVEL = level_bound()-1
    fn level_bound(&self) -> usize;
    /// Generate a random level for a new node in the range `[0, level_bound)`.
    ///
    /// This must never return a level that is `>= self.level_bound)`.
    fn random(&mut self) -> usize;
}
主要是获取最大的 level 层数,以及生成当前节点的 level 层数;
这里也提供了层数生成器的默认实现 DefaultLevelGenerator,定义如下:
boost-rs/src/collection/skiplist/level_generator.rs
pub struct DefaultLevelGenerator {
    level_bound: usize,
    p: f64,
    rng: SmallRng,
}

impl Default for DefaultLevelGenerator {
    fn default() -> Self {
        DefaultLevelGenerator::new(16, 1.0 / 2.0).unwrap()
    }
}

impl DefaultLevelGenerator {
    pub fn new(level_bound: usize, p: f64) -> Result<Self, CollectionError> {
        if level_bound == 0 {
            return Err(CollectionError::InvalidParameter(
                "total must be non-zero.".to_string(),
            ));
        }
        if (p - 0.0).abs() < 1e-3 || (p - 1.0).abs() < 1e-3 {
            return Err(CollectionError::InvalidParameter(
                "p must be in (0,1).".to_string(),
            ));
        }
        Ok(DefaultLevelGenerator {
            level_bound,
            p,
            // unit_range: distributions::Range::new(0.0f64, 1.0),
            rng: SmallRng::from_rng(thread_rng()).unwrap(),
        })
    }
}
定义了:
level_bound:最大层的边界,和 GenerateLevel Trait 中的 level_bound 方法对应;p:进入下一层的概率,和生成层数逻辑有关;rng:随机数生成器;
对应的构造函数逻辑很简单,不再赘述;
实现 GenerateLevel Trait 的逻辑:
boost-rs/src/collection/skiplist/level_generator.rs
impl GenerateLevel for DefaultLevelGenerator {
    fn level_bound(&self) -> usize {
        self.level_bound
    }

    fn random(&mut self) -> usize {
        let mut level = 0;
        let mut x = self.p;
        let f = 1.0 - self.rng.gen::<f64>();
        while x > f && level + 1 < self.level_bound {
            level += 1;
            x *= self.p
        }
        level
    }
}
重点来看 random 方法:默认情况下节点处于 0 层,也就是最底层(跳表的最底层就是一个单向链表);
每当随机数大于给定的 p 后,level 提升一层,同时更新 p 的值;
例如,当 p 取值为 0.5 时:
level=0:有0.5的概率提升到level=1;level=1:有0.5*0.5=0.25的概率提升到level=2;level=2:有0.5*0.5*0.5=0.125的概率提升到level=3;- ……
符合前面所说的概率;
初始化
初始化参数Options
考虑到有多种初始化的场景,例如:
- 使用默认 LevelGenerator;
- 使用默认 LevelGenerator、但自定义 LevelBound;
- 自定义比较顺序等;
因此定义了 Options:
/// The options to create a skip list
pub struct Options<T: 'static> {
    // Custom comparator
    pub cmp: Option<Comparator<T>>,
    // Use default level generator, but set different max level(default is 16)
    pub level_bound: Option<usize>,
    // Use custom level generator
    pub level_generator: Option<Box<dyn GenerateLevel>>,
}
分别对应不同的初始化参数;
同时,为了方便使用,为 Options 提供了多个 take 方法,用于将具体的参数构建成对应结构并移除所有权:
impl<T> Options<T> {
    pub fn take_level_generator(&mut self) -> Result<Box<dyn GenerateLevel>, CollectionError> {
        match self.level_generator.take() {
            Some(g) => Ok(g),
            None => {
                let g = match self.level_bound {
                    Some(level_bound) => DefaultLevelGenerator::new(level_bound, 1.0 / 2.0)?,
                    None => DefaultLevelGenerator::default(),
                };
                Ok(Box::new(g))
            }
        }
    }

    pub fn take_comparator(&mut self) -> Result<Comparator<T>, CollectionError> {
        match self.cmp.take() {
            Some(cmp) => Ok(Box::new(cmp)),
            None => Err(CollectionError::InvalidParameter(
                "comparator must be provided".to_string(),
            )),
        }
    }
}
通过调用 Option.take 方法,我们可以直接获得 Option 中存放的元素的所有权;
然后进行 match 匹配:
- 如果提供了对应参数,则直接使用对应的参数构建并返回;
- 否则使用默认的构造器构造;
逻辑比较简单,这里不再赘述;
在 Rust 中,移出结构体中某个字段的所有权,不会影响其他字段;
例如,下面的代码可以正常编译;
  #[derive(Debug)]
  struct Foo {
      pub a: String,
      pub b: String,
  }

  fn main() {
      let x = Foo {
          a: "a".to_string(),
          b: "b".to_string(),
      };

      let x_a = x.a;
      println!("{:?}", x_a);
      // println!("{:?}", x.a);

      let x_b = x.b;
      println!("{:?}", x_b);
      // println!("{:?}", x.b);

      // println!("{:?}", x);
  }
但是去除任何一个注释,都会导致编译失败!
playground:
初始化有序类型元素
绝大多数 Rust 内置的类型都实现了 Ord Trait(除了浮点数类型),用于进行全序的比较;
关于 Ord 和 ParialOrd Trait:
因此,我们可以为实现了 Ord Trait 的类型单独实现一些方法,这样就不需要再指定比较顺序了;
如下:
impl<T: Ord> OrdSkipList<T> {
    pub fn new() -> Self {
        let g = DefaultLevelGenerator::default();
        Self {
            length: 0,
            cmp: Box::new(|x, y| x.cmp(y)),
            head: NonNull::new(Box::into_raw(Box::new(SkipNode::head(g.level_bound())))).unwrap(),
            level_generator: Box::new(g),
            _marker: PhantomData,
        }
    }

    pub fn ord_with_options(mut options: Options<T>) -> Result<Self, CollectionError> {
        if options.cmp.is_none() {
            options.cmp = Some(Box::new(|x, y| x.cmp(y)))
        }
        Self::with_options(options)
    }
}

impl<T: Ord> Default for OrdSkipList<T> {
    fn default() -> Self {
        let g = DefaultLevelGenerator::default();
        Self {
            length: 0,
            cmp: Box::new(|x, y| x.cmp(y)),
            head: NonNull::new(Box::into_raw(Box::new(SkipNode::head(g.level_bound())))).unwrap(),
            level_generator: Box::new(g),
            _marker: PhantomData,
        }
    }
}
由于 Ord Trait 中已经存在了比较顺序,因此可以直接使用:|x, y| x.cmp(y) 作为 Skiplist 的比较函数;
其他的逻辑非常简单,这里不再赘述;
通用初始化方法
有时某些类型没有实现 Ord Trait,但是也可以指定对应的比较函数来指定顺序;
此时也需要为这些类型实现通用的初始化方法:
impl<T> OrdSkipList<T> {
    pub fn with_options(mut options: Options<T>) -> Result<Self, CollectionError> {
        let g = options.take_level_generator()?;
        Ok(Self {
            length: 0,
            head: NonNull::new(Box::into_raw(Box::new(SkipNode::head(g.level_bound())))).unwrap(),
            cmp: options.take_comparator()?,
            level_generator: g,
            _marker: PhantomData,
        })
    }
}
直接通过前面 Options 中定义的 take_level_generator 和 take_comparator 获取参数即可!
实现非常简洁!
元素存在Contains
contains 方法用来检测一个元素是否存在;
前面说到,在查询时,我们从最高层开始,从前向后比较:
- 如果当前值等于 v,直接返回;
- 如果当前值小于 v,则继续向后;
- 如果当前值大于 v,则向下一级,然后重复上面的步骤;
实现的代码如下:
/// Returns true if the value is contained in the skiplist.
pub fn contains(&self, v: &T) -> bool {
  unsafe {
    let mut cur = self.head.as_ref();

    for i in (0..=cur.level).rev() {
      while let Some(next_node) = cur.next[i] {
        let next_node = next_node.as_ref();
        if (self.cmp)(next_node.val.as_ref().unwrap(), v) == Ordering::Less {
          cur = next_node;
        } else {
          break;
        }
      }
      if cur.next[i].is_some()
      && (self.cmp)(cur.next[i].unwrap().as_ref().val.as_ref().unwrap(), v)
      == Ordering::Equal
      {
        return true;
      }
    }
  }
  false
}
首先,通过 (0..=cur.level).rev() 创建当前节点 [level, 0] 的 level 区间从上到下遍历;
随后,在每一层中通过 while let 匹配当前 level 中下一个非空节点,并使用 cmp 函数进行比较;
和之前讲述对应的:
- 如果当前值小于 v,则继续向后移动:
cur = next_node; - 否则,break 当前 while 循环,继续向下执行;
跳出循环后有两种可能:
- 当前值等于 v,说明找到了 v 返回 true;
- 否则,继续下一个 for 循环,此时 level 下降,继续寻找下一层;
首个元素Peek、Pop操作
首个元素的 peek_front 操作实现如下:
pub fn peek_front(&self) -> Option<&T> {
  unsafe {
    let first_node = self.head.as_ref().next[0].as_ref();
    match first_node {
      Some(node) => node.as_ref().val.as_ref(),
      None => None,
    }
  }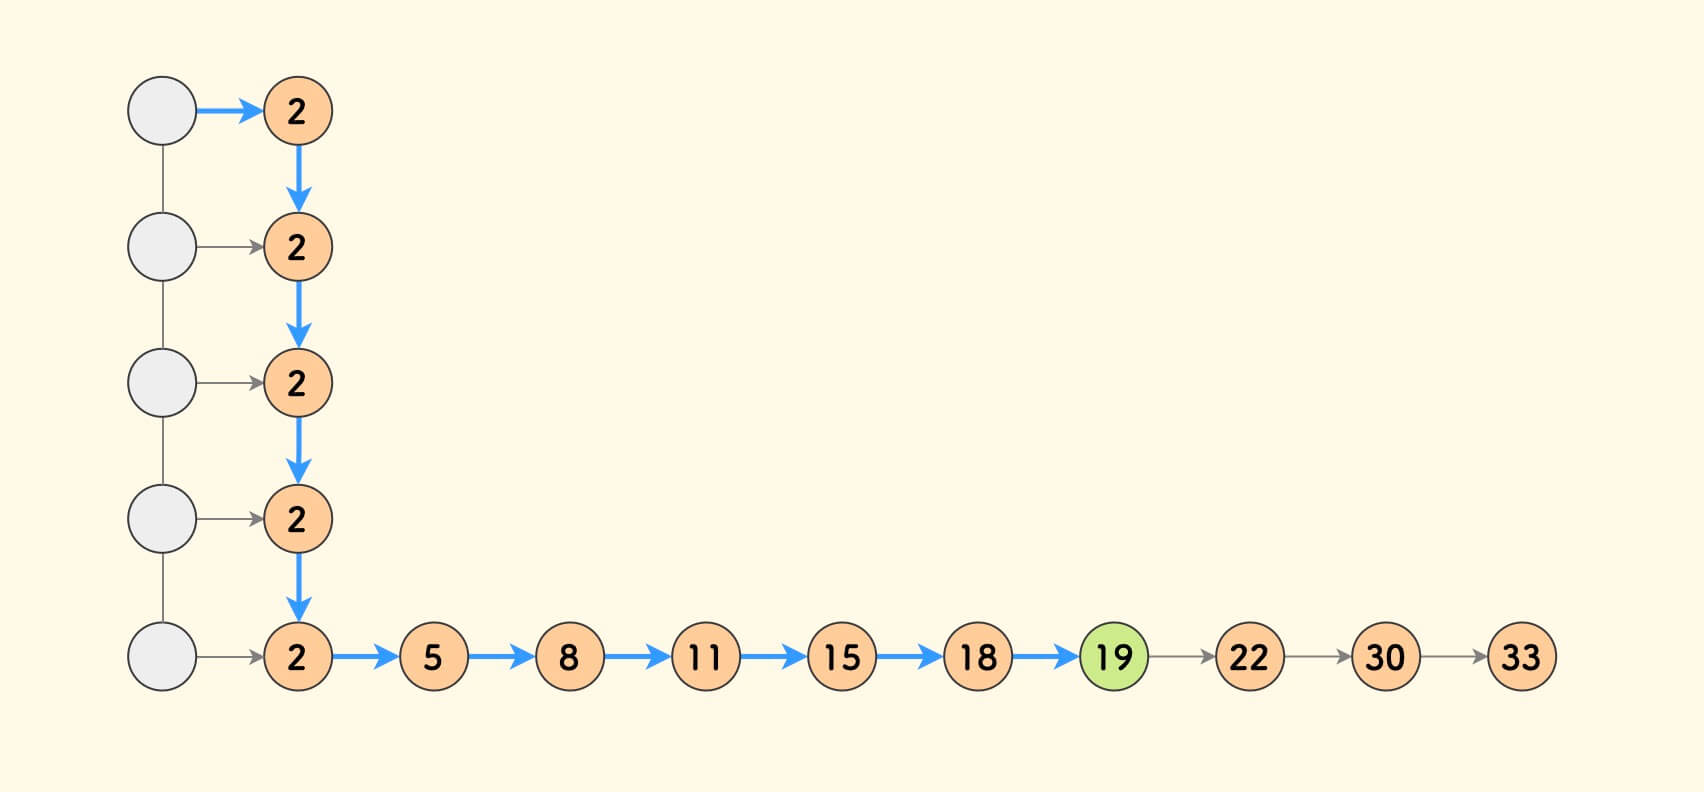
}实现非常简单:因为 Skiplist 的最底层 next[0] 构成了一个单向链表,所以我们只需要取到 head.next[0] 即可!
pop_front 操作也非常简单,只需要使用 remove 方法将首个节点移除即可!
pub fn pop_front(&mut self) -> Option<T> {
  unsafe {
    let first_node = self.head.as_ref().next[0].as_ref();
    match first_node {
      Some(node) => self.remove(node.as_ref().val.as_ref().unwrap()),
      None => None,
    }
  }
}
remove 方法下文会讲;
插入元素Insert
插入元素 insert 方法的实现逻辑如下:
pub fn insert(&mut self, data: T) -> Result<(), CollectionError> {
  if self.contains(&data) {
    return Err(CollectionError::DuplicateKey);
  }

  let level = self.level_generator.random();
  let new_node = Box::new(SkipNode::new(data, level));
  let mut new_node = NonNull::new(Box::into_raw(new_node));

  unsafe {
    let mut cur = self.head.as_mut();
    for i in (0..=cur.level).rev() {
      while let Some(mut next_node) = cur.next[i] {
        let next_node = next_node.as_mut();
        if (self.cmp)(
          next_node.val.as_ref().unwrap(),
          new_node.as_ref().unwrap().as_ref().val.as_ref().unwrap(),
        ) == Ordering::Less
        {
          cur = next_node;
        } else {
          break;
        }
      }

      if level >= i {
        match cur.next[i] {
          Some(next) => {
            cur.next[i] = new_node;
            new_node.as_mut().unwrap().as_mut().next[i] = Some(next);
          }
          None => {
            cur.next[i] = new_node;
          }
        }
      }
    }
  }

  self.length += 1;

  Ok(())
}
首先,判断了当前 Skiplist 中不包含此元素(为了简单起见,本实现不能插入相同的元素),如果存在则报错;
随后,通过 level_generator 为将要插入的结点生成随机的层数,然后通过 SkipNode 构建节点,并转为裸指针;
随后遍历各层,找到要插入的节点的前一个位置 cur;
随后,如果 level >= 当前层,将当前节点插入当前层;
相当于对
0~new_node.level的每一层都做了一次链表的插入操作!
移除元素Remove
Remove 方法实现如下:
pub fn remove(&mut self, val: &T) -> Option<T> {
  if !self.contains(val) {
    return None;
  }

  let mut cur = unsafe { self.head.as_mut() };
  let max_level = cur.level;
  let mut update: Vec<Option<*mut SkipNode<T>>> = vec![None; max_level + 1];
  let ret_val;
  unsafe {
    for i in (0..=max_level).rev() {
      while let Some(mut next_node) = cur.next[i] {
        let next_node = next_node.as_mut();
        if (self.cmp)(next_node.val.as_ref().unwrap(), val) == Ordering::Less {
          cur = next_node;
        } else {
          break;
        }
      }
      update[i] = Some(cur as *mut SkipNode<T>);
    }

    let mut ret_val_ref = None;
    if cur.next[0].is_some()
    && (self.cmp)(cur.next[0].unwrap().as_ref().val.as_ref().unwrap(), val)
    == Ordering::Equal
    {
      ret_val_ref = cur.next[0];
      for i in (0..=max_level).rev() {
        if update[i].is_some()
        && (*update[i].unwrap()).next[i].is_some()
        && (self.cmp)(
          (*update[i].unwrap()).next[i]
          .unwrap()
          .as_mut()
          .val
          .as_ref()
          .unwrap(),
          val,
        ) == Ordering::Equal
        {
          (*update[i].unwrap()).next[i] =
          (*update[i].unwrap()).next[i].unwrap().as_mut().next[i];
        }
      }
    }
    ret_val = match ret_val_ref {
      None => None,
      Some(ret) => Box::from_raw(ret.as_ptr()).into_val(),
    }
  }

  self.length -= 1;

  ret_val
}
和前面 Insert 方法类似,首先也是判断是否存在对应 value,如果不存在直接返回 None 即可!
否则,创建一个用来存放各个层中将要移除的前一个节点的数组 update;
首先,遍历所有层,然后找到每一层中将要移除的前一个节点,加入 update 数组中;
随后,判断如果确实存在将要移除的节点,则遍历 update 数:移除每一层中指定的节点;
最后,使用 Box::from_raw 恢复裸指针,并返回移除的节点的数据以及所有权;
迭代器Iterator
复习一下,Rust 中存在三种迭代器:Iter、IterMut、IntoIter;
Iter、IterMut 可以通过 iter、iter_mut 方法返回对应迭代器:
pub fn iter(&self) -> Iter<T> {
  let node = unsafe { self.head.as_ref().next[0] };

  Iter {
    head: node,
    len: self.length,
    _marker: PhantomData,
  }
}

pub fn iter_mut(&mut self) -> IterMut<T> {
  let node = unsafe { self.head.as_ref().next[0] };

  IterMut {
    head: node,
    len: self.length,
    _marker: PhantomData,
  }
}
同时为 OrdSkipList 实现了 IntoIterator trait 提供了 IntoIter;
下面分别来看;
实现Iter和IterMut
在实现时,Iter 和 IterMut 的差距就是 mut 的类型的差别;
为了避免重复,这里只讲 IterMut 的实现:
pub struct IterMut<'a, T: 'a> {
  head: Link<T>,
  len: usize,
  _marker: PhantomData<&'a mut SkipNode<T>>,
}

impl<'a, T> Iterator for IterMut<'a, T> {
  type Item = &'a mut T;

  #[inline]
  fn next(&mut self) -> Option<Self::Item> {
    if self.len == 0 {
      None
    } else {
      match self.head {
        Some(node) => {
          self.len -= 1;

          unsafe {
            let node = &mut *node.as_ptr();
            self.head = node.next[0];
            node.val.as_mut()
          }
        }
        None => None,
      }
    }
  }

  #[inline]
  fn size_hint(&self) -> (usize, Option<usize>) {
    (self.len, Some(self.len))
  }
}
实际上 IterMut 的实现就行通过修改内部的 head,去遍历 level 0 层即可!
实现IntoIter
IntoIter 的实现就更简单了,只需要调用 pop_front 即可!
我们为 OrdSkipList 实现了 IntoIterator Trait:
pub struct IntoIter<T> {
  list: OrdSkipList<T>,
}

impl<T> Iterator for IntoIter<T> {
  type Item = T;

  #[inline]
  fn next(&mut self) -> Option<Self::Item> {
    self.list.pop_front()
  }

  #[inline]
  fn size_hint(&self) -> (usize, Option<usize>) {
    (self.list.length, Some(self.list.length))
  }
}

impl<T> IntoIterator for OrdSkipList<T> {
  type Item = T;
  type IntoIter = IntoIter<T>;

  fn into_iter(self) -> Self::IntoIter {
    IntoIter { list: self }
  }
}

impl<T> Drop for IntoIter<T> {
  fn drop(&mut self) {
    // only need to ensure all our elements are read;
    // buffer will clean itself up afterwards.
    for _ in &mut *self {}
  }
}
逻辑非常简单,这里不再赘述!
释放空间(所有权)Drop
显而易见的,Skiplist 拥有其内部所有数据的所有权,而由于我们是使用裸指针手动管理的空间,因此需要在 Skiplist 退出作用域后处理对裸指针分配的空间(对应于 C++ 中的析构函数);
得益于我们之前的实现,我们可以使用 pop_front 逐个的将存储的元素通过 Box::from_raw 恢复后释放;
需要稍微注意的是:我们的 header 正好也是不存放任何数据的!
实现如下:
impl<T> Drop for OrdSkipList<T> {
  fn drop(&mut self) {
    struct DropGuard<'a, T>(&'a mut OrdSkipList<T>);

    impl<'a, T> Drop for DropGuard<'a, T> {
      fn drop(&mut self) {
        // Continue the same loop we do below. This only runs when a destructor has
        // panicked. If another one panics this will abort.
        while self.0.pop_front().is_some() {}
      }
    }

    while let Some(node) = self.pop_front() {
      let guard = DropGuard(self);
      drop(node);
      mem::forget(guard);
    }
  }
}
这里的 DropGuard 可以防止在调用 drop 时发生了 panic ;
此时 DropGuard 也被释放,会再次尝试释放元素的空间;
在标准库的 LinkedList 实现中也使用了完全相同的技巧!
测试用例
编写完成后,来加入一些测试用例:
#[cfg(test)]
mod tests {
    use crate::collection::skiplist::level_generator::DefaultLevelGenerator;
    use crate::collection::skiplist::{Options, OrdSkipList};

    #[test]
    fn new() {
        let sl: OrdSkipList<i32> = OrdSkipList::new();
        assert_eq!(sl.length, 0);
    }

    #[test]
    fn ord_with_options_cmp() {
        let sl: OrdSkipList<i32> = OrdSkipList::with_options(Options {
            cmp: Some(Box::new(|x: &i32, y: &i32| y.cmp(x))),
            level_bound: None,
            level_generator: None,
        })
        .unwrap();
        assert_eq!(sl.length, 0);
    }

    #[test]
    fn ord_with_options_level_bound() {
        let sl: OrdSkipList<i32> = OrdSkipList::ord_with_options(Options {
            cmp: None,
            level_bound: Some(1024),
            level_generator: None,
        })
        .unwrap();
        assert_eq!(sl.length, 0);
    }

    #[test]
    fn ord_with_options_level_generator() {
        let g = DefaultLevelGenerator::new(4, 0.5).unwrap();
        let sl: OrdSkipList<i32> = OrdSkipList::ord_with_options(Options {
            cmp: None,
            level_bound: None,
            level_generator: Some(Box::new(g)),
        })
        .unwrap();
        assert_eq!(sl.length, 0);
    }

    #[test]
    fn with_options() {
        struct Foo {
            id: usize,
            data: String,
        }

        let mut sl: OrdSkipList<Foo> = OrdSkipList::with_options(Options {
            cmp: Some(Box::new(|x: &Foo, y: &Foo| y.id.cmp(&x.id))),
            level_bound: None,
            level_generator: None,
        })
        .unwrap();
        assert_eq!(sl.length, 0);

        sl.insert(Foo {
            id: 2,
            data: "2".to_string(),
        })
        .unwrap();
        sl.insert(Foo {
            id: 1,
            data: "1".to_string(),
        })
        .unwrap();

        let first = sl.iter().next().unwrap();
        assert_eq!(first.id, 2);
        assert_eq!(first.data, "2".to_string());
    }

    #[test]
    fn contains() {
        let mut l: OrdSkipList<i32> = OrdSkipList::ord_with_options(Options {
            cmp: None,
            level_bound: Some(16),
            level_generator: None,
        })
        .unwrap();

        let test_len = 10000;
        for i in 0..test_len {
            l.insert(i).unwrap();
        }
        assert_eq!(l.length(), test_len as usize);

        for i in 0..test_len {
            assert!(l.contains(&i));
        }
    }

    #[test]
    fn remove() {
        let mut l: OrdSkipList<i32> = OrdSkipList::new();
        l.insert(12).unwrap();
        assert_eq!(l.length(), 1);
        assert!(l.contains(&12));

        l.remove(&12).unwrap();
        assert_eq!(l.length(), 0);
        assert!(!l.contains(&12));

        l.insert(13).unwrap();
        assert_eq!(l.length(), 1);
        assert!(l.contains(&13));
    }

    #[test]
    fn iter() {
        let mut l: OrdSkipList<i32> = OrdSkipList::new();
        for i in 0..100 {
            l.insert(i).unwrap();
        }

        let mut x = 0;
        l.iter().for_each(|i| {
            assert_eq!(i, &x);
            x += 1;
        });
    }

    #[test]
    fn iter_mut() {
        let mut l: OrdSkipList<i32> = OrdSkipList::new();
        for i in 0..100 {
            l.insert(i).unwrap();
        }
        l.iter_mut().for_each(|node_val| *node_val += 1);
        for x in 1..101 {
            assert_eq!(x, l.pop_front().unwrap());
        }
    }

    #[test]
    fn clear() {
        let mut l: OrdSkipList<i32> = OrdSkipList::new();
        for i in 0..100 {
            l.insert(i).unwrap();
        }
        assert_eq!(l.length(), 100);

        l.clear();
        assert_eq!(l.length(), 0);
        for i in 0..100 {
            assert!(!l.contains(&i));
        }
    }

    #[test]
    fn into_iter() {
        let mut l: OrdSkipList<i32> = OrdSkipList::new();
        for i in 0..10 {
            l.insert(i).unwrap();
        }
        assert_eq!(l.length(), 10);

        let mut l_to_string = l
            .into_iter()
            .map(|x| x.to_string())
            .collect::<Vec<String>>();
        println!(
            "transform l into String vec, l_to_string: {:?}",
            l_to_string
        );

        for i in (0..10).rev() {
            assert_eq!(i.to_string(), l_to_string.pop().unwrap());
        }
        // Compiling err:
        // l.print();
    }
}
再来比较一下 Skiplist 和传统的双向链表的查询效率:
use std::collections::LinkedList;

use rand::Rng;

use boost_rs::collection::skiplist::OrdSkipList;
use boost_rs_macros::elapsed;

#[elapsed]
fn skiplist_random_test(l: &OrdSkipList<i32>, search_val: &Vec<i32>) {
    for i in search_val {
        l.contains(i);
    }
}

#[elapsed]
fn linkedlist_random_test(l: &LinkedList<i32>, search_val: &Vec<i32>) {
    for i in search_val {
        l.contains(i);
    }
}

fn gen_random(cap: usize, search_cap: usize) -> Vec<i32> {
    let mut v = vec![];
    for _ in 0..search_cap {
        let mut rng = rand::thread_rng();
        v.push(rng.gen_range(0..cap) as i32);
    }
    v
}

fn main() {
    let mut sl = OrdSkipList::default();
    let mut ll = LinkedList::new();
    let cap = 100000;
    let search_cap = 10000;
    let search_val = gen_random(cap, search_cap);

    for x in 0..cap {
        let x = x as i32;
        sl.insert(x).unwrap();
        ll.push_back(x);
    }

    skiplist_random_test(&sl, &search_val);
    linkedlist_random_test(&ll, &search_val);
}
在上面的例子中,首先生成了 10000 个 0~100000 的随机数,随后使用 container 方法进行访问;
输出的结果如下:
Run in "skiplist_random_test" cost time: 23.069291ms
Run in "linkedlist_random_test" cost time: 6.050070916s
差距是非常巨大的!
Redis中选择SkipList的原因
There are a few reasons:
1.They are not very memory intensive. It’s up to you basically. Changing parameters about the probability of a node to have a given number of levels will make then less memory intensive than btrees.
2.A sorted set is often target of many ZRANGE or ZREVRANGE operations, that is, traversing the skip list as a linked list. With this operation the cache locality of skip lists is at least as good as with other kind of balanced trees.
3.They are simpler to implement, debug, and so forth. For instance thanks to the skip list simplicity I received a patch (already in Redis master) with augmented skip lists implementing ZRANK in O(log(N)). It required little changes to the code.
我们知道 Redis 中有序集合就是通过跳表 + 散列表来实现的。Redis 中有序集合支持的核心操作主要有这么几个:
- 插入一个数据
- 删除一个数据
- 查找一个数据
- 按照区间查找数据(比如查找值在 [100,356] 之间的数据)
- 迭代输出有序序列
其中,插入、删除、查找以及迭代输出有序序列这几个操作,红黑树也可以完成,时间复杂度跟跳表是一样的;但是,按照区间来查找数据这个操作,红黑树的效率没有跳表高;
对于按照区间查找数据这个操作,跳表可以做到 O(logn) 的时间复杂度定位区间的起点,然后在原始链表中顺序往后遍历就可以了,这样做非常高效;
当然,Redis 之所以用跳表来实现有序集合,还有其他原因,比如:
- 跳表比起红黑树的实现简直是容易多了,而简单就意味着可读性好,不容易出错;
- 跳表更加灵活,它可以通过改变索引构建策略,有效平衡执行效率和内存消耗;
总结
本文首先讲解了 Skiplist 的基本原理、构建过程以及随机化;
然后使用 Rust 实现了一个 Skiplist,对于更加复杂的跳表实现起来也是基本类似;
附录
源代码:
- https://github.com/JasonkayZK/boost-rs/blob/main/boost-rs/src/collection/linkedlist.rs
- https://github.com/JasonkayZK/boost-rs/tree/main/boost-rs/src/collection/skiplist
参考文章:
- https://juejin.cn/post/7000940966995558431
- https://snayan.github.io/post/2019/algorithm_skip_list/
- https://writings.sh/post/data-structure-skiplist
- https://zhuanlan.zhihu.com/p/101143158