
紧接着上一部分,这部分将深度分析HashMap中的TreeNode内部类(它是实现HashMap等链表和红黑树数据结构的类), 然后再回到HashMap中讲述HashMap中的问题, 以及HashMap的使用:
- 数据结构Tree的发展史
- HashMap中TreeNode的源码分析
- HashMap中的hash冲突
- HashMap中的Rehash操作
- HashMap遍历方式(整表遍历, 并发遍历)
零. 数据结构Tree
树
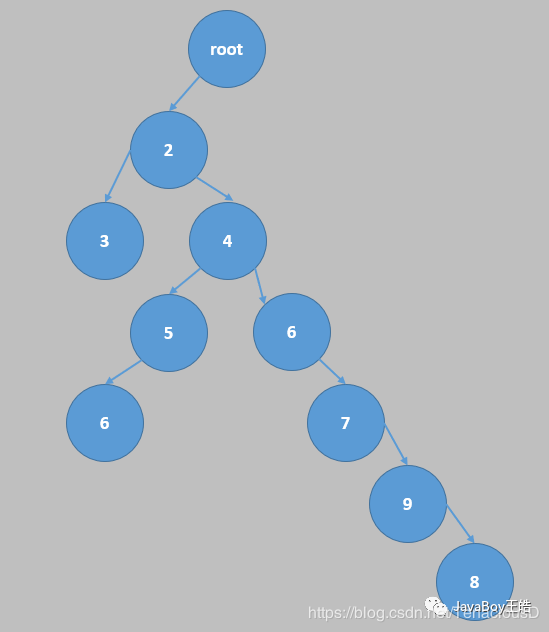
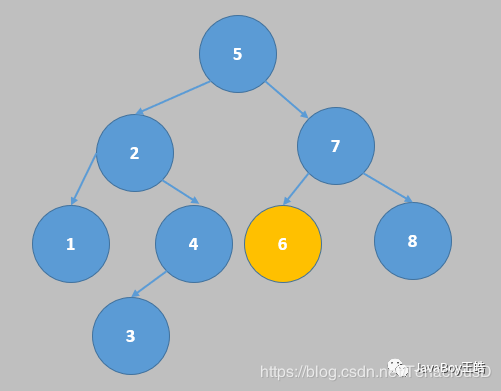
上图是一个简单的树形结构,最顶层为一个根节点,向下延伸出树杈和叶子构成一个具有层次关系的集合,例如前端树形插件Ztree
叶子节点: 一个节点也是一颗树,这个节点就是root根节点,上图中3,6和8没有下级节点,这种节点被称为叶子节点
任何一个节点下有子节点则构成子树。根节点没有父节点,叶子节点没有子节点,除了根节点没有父节点外其他的节点都只有一个父节点。任何节点可以有n的子节点
从某一个节点出发,到叶子节点的最少边数为该节点的高度(度). 例如,root节点的高度为5,2的高度为1,因为到最近的叶子节点3的边数为1, 4的高度为2
从root节点出发到某一个节点的边数为该节点的深度: 例如,root的深度为0, 2的深度为1, 5的深度为3
以上就是最基础的树形结构,以此为基础,我们继续向后延伸
二叉树
每个节点至多有两个子节点的树叫做二叉树
平衡二叉树
平衡二叉树在二叉树的基础上添加了新的限制,即树的左右高度之差小于等于1
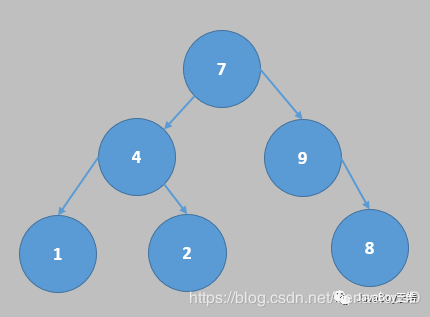
以7节点为准,左侧高度7到1叶子节点高度为2,7到8的叶子节点高度为2相等,高度差为0,节点4同理左右各两条边高度差为0,节点9左右高度差为1小于等于1,所以上图为一棵标准平衡二叉树
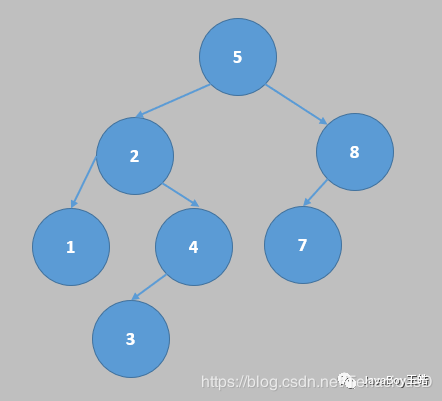
二叉查找树
二叉查找树(Binary Search Tree),又称二叉排序树(Binary Sort Tree),亦称二叉搜索树
二叉查找树在平衡二叉树的基础上继续添加了限制,但是会由于不断增加和删除节点失去平衡特性
首先我们先看一下增加了什么限制:
- 若左子树不空,则左子树上所有节点的值均小于它的根节点的值
- 若右子树不空,则右子树上所有节点的值均大于它的根节点的值
查找: 为简单的判断查找值比节点小的向左,比节点值大的向右,直到找到数据或者查到叶子节点还没有找到。查找平均复杂度为O(log n)
添加与删除节点: 树的结构通常不是一次生成的,而是在查找过程中,当树中不存在关键字等于给定值的结点时再进行插入。新插入的结点一定是一个新添加的叶子结点,并且是查找不成功时查找路径上访问的最后一个结点的左子或右子结点。
不断的添加与删除容易使平衡查找树失去平衡,所以为了保持平衡性,后面又诞生了很多新的算法树
AVL树
本身首先是一棵二叉查找树,但又与二叉查找树不同,AVL树是最先发明的自平衡二叉查找树,本质上是带了平衡功能的二叉查找树
AVL树的增加与删除节点与普通二叉查找树不同,它是以旋转使树重新达到平衡。分为右旋(顺时针)与左旋(逆时针)两种操作
.png)
右旋以某个节点为中心上图为15,将17向右沉入其右子节点位置,节点15变为新的根节点,15原右子节点变为17的左子节点
.png)
左旋为逆时针,以某个基点为中心例如上图18节点,将17节点其沉入其右子节点的位置,18作为新的根节点其原来的左子节点变为17的右子节点
以上为单纯的旋转,接下来我们看一下添加节点时如何变化
这是一个AVL树,当我们要添加节点6时如下图
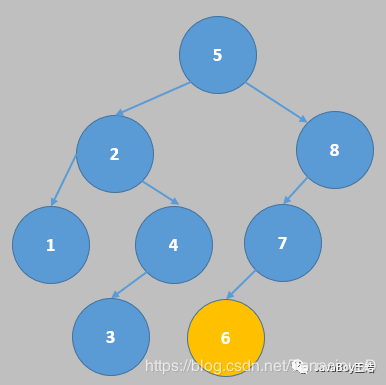
首先根据普通规则比5大,向右,比8小向左,比7小且7位叶子节点,6被新建到7的左子节点。但是这样8节点下的子树会失去平衡,这时AVL自平衡会开始旋转来使其达到平衡
以7为中心节点,将8沉入其右子节点位置,7变为子树的根节点,如下图
通过单次旋转就又使树达到了平衡
从AVL树中删除可以通过把要删除的节点向下旋转成一个叶子节点,接着直接剪除这个叶子节点来完成
红黑树
红黑树(Red Black Tree) 是一种自平衡二叉查找树,在1972年由Rudolf Bayer发明的,当时被称为平衡二叉B树(symmetric binary B-trees)。后来,在1978年被 Leo J. Guibas 和 Robert Sedgewick 修改为如今的“红黑树”
红黑树和AVL树类似,都是在进行插入和删除操作时通过特定操作保持二叉查找树的平衡,从而获得较高的查找性能,它可以在O(log n)时间内做查找,插入和删除
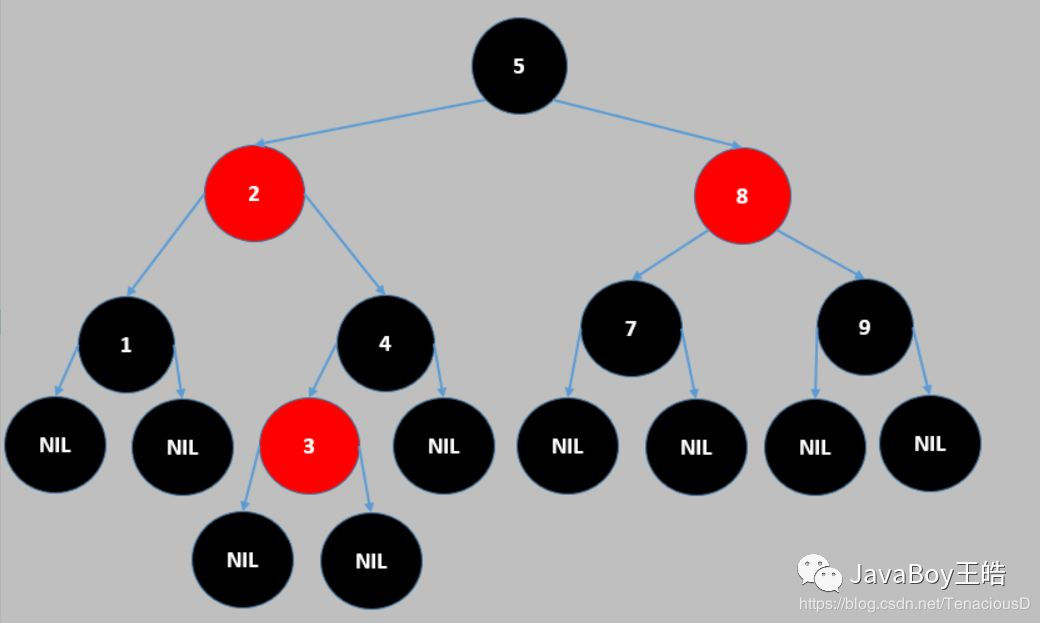
相对于二叉查找树,红黑树又添加了以下限制:
- 每个树节点会被染色,每个节点只能是红色或者黑色
- 根节点一定是黑色的
- nil节点为黑色,nil节点为所有叶子节点的虚拟子节点
- 不可出现父子节点都为红色的情况
- 从某一个节点到该节点的子孙节点的所有路径上包含相同数目的黑节点
补充:
- nil是一个对象值,如果要把一个对象设置为空的时候就用nil
- Nil是一个类对象的值,如果要把一个Class类型的对象设置为空的时候就用Nil
- NULL是一个通用指针
以上约束条件保证了之前说的增删查的复杂度均在O(log n)级别。第五点也是保证子树平衡的关键
一. HashMap中TreeNode的源码分析
HashMap使用数组: Node[] 存储TreeNode的形式作为数据的存储结构,故要掌握HashMap需要先看懂TreeNode:
HashMap中的TreeNode源码如下(建议在看源码之前先看下面各章的总结, 便于理解):
/**
* TreeNode继承自LinkedHashMap.Entry, 而后者又继承自HashMap.Node
* TreeNode具备红黑树的性质,但又有异于红黑树
* 由于两种存储形式的存在:
* 插入或删除都要实现两部分的逻辑以及进行当前存储形式的判断
*
* 链栈:prev + next实现,节点数<7
* 树: parent + left + right实现
*
* 红黑树操作
* 包括:树旋转、插入/删除节点后平衡红黑树
*
* 基本操作
* 包括:树化、链栈化、增删查节点、根节点变更
*/
static final class TreeNode<K,V> extends LinkedHashMap.Entry<K,V> {
// 链栈:prev + next实现,节点数<7
// 树: parent + left + right实现
TreeNode<K,V> parent; // 与left、right联合使用实现树结构(red-black tree links)
TreeNode<K,V> left; // 红黑树当前节点的左节点
TreeNode<K,V> right; // 当前节点的右节点
TreeNode<K,V> prev; // 前一个关联节点, 在删除节点时使用(needed to unlink next upon deletion)
boolean red; // bool,记录树节点颜色
// Node中继承
hash // [(n-1) & hash]定位数组的位置
key // key.hashCode()为hash提供原始hashCode
value // 值
next // 与prev联合使用实现链栈结构
// LinkedHashMap.Entry<K,V>,TreeNode内暂未涉及
before
after
// 通过k-v对, hash值和
TreeNode(int hash, K key, V val, Node<K,V> next) {
super(hash, key, val, next);
}
// 返回包含此节点的树的根节点
final TreeNode<K,V> root() {
// 定义两个TreeNode,一个是父节点指针,指向当前节点的parent
// 所以功能很明显了。就是遍历直到头节
for (TreeNode<K,V> r = this, p;;) {
if ((p = r.parent) == null)
return r;
r = p;
}
}
// 确保所给的root是第一个节点。也就是把所给的root移到第一个节点
// 确保桶中的红黑树的根节点是root
static <K,V> void moveRootToFront(Node<K,V>[] tab, TreeNode<K,V> root) {
int n;
if (root != null && tab != null && (n = tab.length) > 0) {
// 根节点的位置
int index = (n - 1) & root.hash;
// 链表的操作,把root移到第一个节点
// root的next指向原先的头节点,原先的头节点的prev指向root
TreeNode<K,V> first = (TreeNode<K,V>)tab[index];
if (root != first) {
Node<K,V> rn;
tab[index] = root;
TreeNode<K,V> rp = root.prev;
if ((rn = root.next) != null)
((TreeNode<K,V>)rn).prev = rp;
if (rp != null)
rp.next = rn;
if (first != null)
first.prev = root;
// root的next的prev指向root的prev,root的prev指向root的next
// 即把root在prev和next中去掉
root.next = first;
root.prev = null;
}
// 红黑树的一致性检查
assert checkInvariants(root);
}
}
/**
* 使用给定的哈希和键查找从根p开始的节点.(查找hash为h,key为k的节点)
* 在第一次比较kc参数时使用comparableClassFor(key)
*
*
* Finds the node starting at root p with the given hash and key.
* The kc argument caches comparableClassFor(key) upon first use
* comparing keys.
*/
final TreeNode<K,V> find(int h, Object k, Class<?> kc) {
TreeNode<K,V> p = this;
do {
int ph, dir; K pk;
TreeNode<K,V> pl = p.left, pr = p.right, q;
if ((ph = p.hash) > h)
p = pl;
else if (ph < h)
p = pr;
else if ((pk = p.key) == k || (k != null && k.equals(pk)))
return p;
else if (pl == null)
p = pr;
else if (pr == null)
p = pl;
else if ((kc != null ||
(kc = comparableClassFor(k)) != null) &&
(dir = compareComparables(kc, k, pk)) != 0)
p = (dir < 0) ? pl : pr;
else if ((q = pr.find(h, k, kc)) != null)
return q;
else
p = pl;
} while (p != null);
return null;
}
/**
* 获取树节点: 根节点查找hash为h,key为k的节点
* Calls find for root node.
*/
final TreeNode<K,V> getTreeNode(int h, Object k) {
return ((parent != null) ? root() : this).find(h, k, null);
}
/**
* 用于在哈希码相等且不可比较时排序插入的方法
* 不需要总顺序,只需要一个一致的插入规则,以保持在重新平衡之间的等价性
* 此方法必要时能简化测试
* Tie-breaking utility for ordering insertions when equal
* hashCodes and non-comparable. We don't require a total
* order, just a consistent insertion rule to maintain
* equivalence across rebalancings. Tie-breaking further than
* necessary simplifies testing a bit.
*/
static int tieBreakOrder(Object a, Object b) {
int d;
if (a == null || b == null ||
(d = a.getClass().getName().
compareTo(b.getClass().getName())) == 0)
d = (System.identityHashCode(a) <= System.identityHashCode(b) ?
-1 : 1);
return d;
}
/**
* 把链表生成红黑树
*
* Forms tree of the nodes linked from this node.
*/
final void treeify(Node<K,V>[] tab) {
TreeNode<K,V> root = null;
// 两个指针,一个是链表的表头,一个是下一个指针
for (TreeNode<K,V> x = this, next; x != null; x = next) {
next = (TreeNode<K,V>)x.next;
x.left = x.right = null;
// 先设定 root为头节点,parent为null,根节点为黑色
if (root == null) {
x.parent = null;
x.red = false;
root = x;
}
else {
K k = x.key;
int h = x.hash;
Class<?> kc = null;
// 遍历红黑树
for (TreeNode<K,V> p = root;;) {
int dir, ph;
K pk = p.key;
// 如果当前树节点的hash > 链表节点的hash则dir值为-1
if ((ph = p.hash) > h)
dir = -1;
// 否则为1
else if (ph < h)
dir = 1;
// 如果不按照hash值比较的话,并且比较器不存在或者比较器比较的值是0的话
// 则把死结打开
else if ((kc == null &&
(kc = comparableClassFor(k)) == null) ||
(dir = compareComparables(kc, k, pk)) == 0)
dir = tieBreakOrder(k, pk);
// 设置一个红黑树的节点
TreeNode<K,V> xp = p;
// 设置节点的走向,如果dir <= 0则p为做节点,否则为右
// 也就是找到链表节点应该插入的位置
if ((p = (dir <= 0) ? p.left : p.right) == null) {
// 设置链表节点的父节点
x.parent = xp;
if (dir <= 0)
xp.left = x;
else
xp.right = x;
// 插入节点,并且不破坏红黑树的性质
root = balanceInsertion(root, x);
break;
}
}
}
}
// 设置头节点
moveRootToFront(tab, root);
}
/**
* 根据当前节点的next关系提取节点
* 节点提供key,value,hash用于new Node节点创建链栈
*
* Returns a list of non-TreeNodes replacing those linked from
* this node.
*/
final Node<K,V> untreeify(HashMap<K,V> map) {
Node<K,V> hd = null, tl = null;
for (Node<K,V> q = this; q != null; q = q.next) {
// replacementNode new一个Node,根据q的k,v,h,next
Node<K,V> p = map.replacementNode(q, null);
if (tl == null)
hd = p;
else
tl.next = p;
tl = p;
}
return hd;
}
/**
* 红黑树的putVal版本实现: (它包含了TreeNode中的所有用于向下判断方向的方法)
*
* 方法实现,判断key若不存在(HashMap中不能存在相同的key),定位 + 插入:
* 定位,根据hash值判断,向下遍历
* 1 hash值不同,根据大小判断向下循环的方向
* 2 hash值相同,可能性不大,但是存在, HashMap事先预想到这种情况已经实现了判断的方法:
* hash值相同则调用HashMap的方法实现判断方向
* 插入,循环遍历到空节点时可进行插入:
* 1 链接perv + next
* 2 链接parent + left and right
* 3 设定颜色和平衡红黑树
*
* Tree version of putVal.
*/
final TreeNode<K,V> putTreeVal(HashMap<K,V> map, Node<K,V>[] tab,
int h, K k, V v) {
Class<?> kc = null;
boolean searched = false;
TreeNode<K,V> root = (parent != null) ? root() : this;
for (TreeNode<K,V> p = root;;) {
int dir, ph; K pk;
// 通过hash和key判断
// hash值不相同
if ((ph = p.hash) > h)
dir = -1;
else if (ph < h)
dir = 1;
// hash值相同
// key已存在,不能存在相同的key
else if ((pk = p.key) == k || (k != null && k.equals(pk)))
return p;
// 不同key的hash值相同,需要用到HashMap定义的判断方法
else if ((kc == null &&
(kc = comparableClassFor(k)) == null) ||
(dir = compareComparables(kc, k, pk)) == 0) {
if (!searched) {
TreeNode<K,V> q, ch;
searched = true;
if (((ch = p.left) != null &&
(q = ch.find(h, k, kc)) != null) ||
((ch = p.right) != null &&
(q = ch.find(h, k, kc)) != null))
return q;
}
dir = tieBreakOrder(k, pk);
}
// 找到空节点,插入新节点
TreeNode<K,V> xp = p;
if ((p = (dir <= 0) ? p.left : p.right) == null) {
Node<K,V> xpn = xp.next;
TreeNode<K,V> x = map.newTreeNode(h, k, v, xpn);
if (dir <= 0)
xp.left = x;
else
xp.right = x;
xp.next = x;
x.parent = x.prev = xp;
if (xpn != null)
((TreeNode<K,V>)xpn).prev = x;
// 新节点插入树,平衡红黑树
moveRootToFront(tab, balanceInsertion(root, x));
return null;
}
}
}
/**
* 删除给定的节点,该节点必须在此调用之前存在
* 这比典型的红黑删除代码更复杂:
* 因为我们不能将内部节点的内容与叶继承者交换,叶继承者由在遍历期间可以独立访问的“下一个”指针固定
* 所以我们交换树链接:
* 如果当前树的节点太少,则会将bin转换回普通bin。
* (测试在2到6个节点之间触发,具体取决于树结构)
*
*
* Removes the given node, that must be present before this call.
* This is messier than typical red-black deletion code because we
* cannot swap the contents of an interior node with a leaf
* successor that is pinned by "next" pointers that are accessible
* independently during traversal. So instead we swap the tree
* linkages. If the current tree appears to have too few nodes,
* the bin is converted back to a plain bin. (The test triggers
* somewhere between 2 and 6 nodes, depending on tree structure).
*/
final void removeTreeNode(HashMap<K,V> map, Node<K,V>[] tab,
boolean movable) {
// section 1:通过prev和next删除当前节点
int n;
if (tab == null || (n = tab.length) == 0)
return;
int index = (n - 1) & hash;
TreeNode<K,V> first = (TreeNode<K,V>)tab[index], root = first, rl;
TreeNode<K,V> succ = (TreeNode<K,V>)next, pred = prev;
if (pred == null)
tab[index] = first = succ;
else
pred.next = succ;
if (succ != null)
succ.prev = pred;
if (first == null)
return;
// section 2:当节点数量小于7时转换成链栈的形式存储
if (root.parent != null)
root = root.root();
if (root == null
|| (movable
&& (root.right == null
|| (rl = root.left) == null
|| rl.left == null))) {
tab[index] = first.untreeify(map); // too small
return;
}
// section 3:判断当前树节点情况
TreeNode<K,V> p = this, pl = left, pr = right, replacement;
if (pl != null && pr != null) {
TreeNode<K,V> s = pr, sl;
while ((sl = s.left) != null) // find successor
s = sl;
boolean c = s.red; s.red = p.red; p.red = c; // swap colors
TreeNode<K,V> sr = s.right;
TreeNode<K,V> pp = p.parent;
if (s == pr) { // p was s's direct parent
p.parent = s;
s.right = p;
}
else {
TreeNode<K,V> sp = s.parent;
if ((p.parent = sp) != null) {
if (s == sp.left)
sp.left = p;
else
sp.right = p;
}
if ((s.right = pr) != null)
pr.parent = s;
}
p.left = null;
if ((p.right = sr) != null)
sr.parent = p;
if ((s.left = pl) != null)
pl.parent = s;
if ((s.parent = pp) == null)
root = s;
else if (p == pp.left)
pp.left = s;
else
pp.right = s;
if (sr != null)
replacement = sr;
else
replacement = p;
}
else if (pl != null)
replacement = pl;
else if (pr != null)
replacement = pr;
else
replacement = p;
// section 4:实现删除树节点逻辑
if (replacement != p) {
TreeNode<K,V> pp = replacement.parent = p.parent;
if (pp == null)
root = replacement;
else if (p == pp.left)
pp.left = replacement;
else
pp.right = replacement;
p.left = p.right = p.parent = null;
}
TreeNode<K,V> r = p.red ? root : balanceDeletion(root, replacement);
if (replacement == p) { // detach
TreeNode<K,V> pp = p.parent;
p.parent = null;
if (pp != null) {
if (p == pp.left)
pp.left = null;
else if (p == pp.right)
pp.right = null;
}
}
if (movable)
moveRootToFront(tab, r);
}
/**
* 将树箱中的节点拆分为上下树箱,如果现在太小,则取消搜索仅从resize调用;
* 请参阅上面关于拆分位和索引的讨论
*
* 节点拆分 + 判断链接 + 重新存储
* 节点拆分,通过next=null
* 判断链接:
* 1 通过bit&hash区分 ==0(lo) 和 !=(hi),根据注释介绍,该方法只有resize调用,进入该方法发现bit是原数组的长度
* 2 创建lo和hi两组节点来分别记录两种情况,如lo,loH--头节点,loT--尾节点,lc,记录节点数
* 根据头节点非空和节点数判断存储形式存入数组相应位置
*
* Splits nodes in a tree bin into lower and upper tree bins,
* or untreeifies if now too small. Called only from resize;
* see above discussion about split bits and indices.
*
* @param map 要操作的Map对象
* @param tab 桶的头
* @param index 要拆分的索引
* @param bit 要拆分的哈希位
*/
final void split(HashMap<K,V> map, Node<K,V>[] tab, int index, int bit) {
TreeNode<K,V> b = this;
// Relink into lo and hi lists, preserving order
TreeNode<K,V> loHead = null, loTail = null;
TreeNode<K,V> hiHead = null, hiTail = null;
int lc = 0, hc = 0;
for (TreeNode<K,V> e = b, next; e != null; e = next) {
// 剥离节点
next = (TreeNode<K,V>)e.next;
e.next = null;
// 链接可保留在原数组位置的节点
if ((e.hash & bit) == 0) {
if ((e.prev = loTail) == null)
loHead = e;
else
loTail.next = e;
loTail = e;
++lc;
}
// 提取链接重新定义数组位置的节点(数组扩容后的新位置)
else {
if ((e.prev = hiTail) == null)
hiHead = e;
else
hiTail.next = e;
hiTail = e;
++hc;
}
}
// 保存留在数组原位置的节点,根据节点数判断存储类型
if (loHead != null) {
if (lc <= UNTREEIFY_THRESHOLD) // UNTREEIFY_THRESHOLD = 6
tab[index] = loHead.untreeify(map);
else {
tab[index] = loHead;
if (hiHead != null) // (else is already treeified)
loHead.treeify(tab);
}
}
// 保存提取到数组扩容新位置的节点,根据节点数判断存储类型
if (hiHead != null) {
if (hc <= UNTREEIFY_THRESHOLD)
tab[index + bit] = hiHead.untreeify(map);
else {
tab[index + bit] = hiHead;
if (loHead != null)
hiHead.treeify(tab);
}
}
}
/* ------------------------------------------------------------ */
/* 红黑树方法,全部改编自CLR */
/* Red-black tree methods, all adapted from CLR */
// 左旋转
static <K,V> TreeNode<K,V> rotateLeft(TreeNode<K,V> root,
TreeNode<K,V> p) {
// 三个节点,右节点,parent的parent节点,右的左节点
TreeNode<K,V> r, pp, rl;
// 该节点不为null并且右节点不为null
if (p != null && (r = p.right) != null) {
// 因为是左旋,所以如果右节点的左节点如果不为null,则rl的根节点设为p
if ((rl = p.right = r.left) != null)
rl.parent = p;
// 如果左旋后的头节点为根节点,则根据红黑树的性质,颜色为黑色
if ((pp = r.parent = p.parent) == null)
(root = r).red = false;
// 因为是左旋,所以p的位置由pr取代,所以p的parent节点的p位置设为现在pr的位置
else if (pp.left == p)
pp.left = r;
else
pp.right = r;
// 然后r的left是p,p的父节点是r
r.left = p;
p.parent = r;
}
return root;
}
// 右旋转
static <K,V> TreeNode<K,V> rotateRight(TreeNode<K,V> root,
TreeNode<K,V> p) {
// 定义3个节点,左节点,头节点的头节点,左节点的右节点
TreeNode<K,V> l, pp, lr;
// 要旋转的节点和左节点不为空时
if (p != null && (l = p.left) != null) {
// 根据右旋,(原)头节点的左节点为原先左节点的右节点,并且把其父节点设为原头节点,即p
if ((lr = p.left = l.right) != null)
lr.parent = p;
// 同样,如果现在的头节点为根节点的话,标记节点的颜色为黑色
if ((pp = l.parent = p.parent) == null)
(root = l).red = false;
// 头节点的头节点设定其自节点
else if (pp.right == p)
pp.right = l;
else
pp.left = l;
// 同样,根据右旋,指定现在的头节点的右节点为原先的头节点,原先的头节点的父节点为现在的头节点
l.right = p;
p.parent = l;
}
return root;
}
// 保证插入节点后,红黑树仍然是平衡的
// 见证红黑树的高效性,因为更新树的话只是旋转操作
// 即改变下指针的位置,并且设置一下节点的位置就可以了
static <K,V> TreeNode<K,V> balanceInsertion(TreeNode<K,V> root,
TreeNode<K,V> x) {
// 先把节点设为红色
x.red = true;
// 定义四个节点
for (TreeNode<K,V> xp, xpp, xppl, xppr;;) {
// 如果x是根节点,则把它设为黑色,并返回根节点
if ((xp = x.parent) == null) {
x.red = false;
return x;
}
// 如果x的父节点即xp是黑色,并且xp为根节点,则返回,什么也不做
else if (!xp.red || (xpp = xp.parent) == null)
return root;
// 如果xp为xp父节点的左节点
if (xp == (xppl = xpp.left)) {
// 如果xpp的右节点非空并且是红色的
// 那么把其设为黑色,xpp的左节点也设为黑色,xpp设为红色,并且x等于xpp
if ((xppr = xpp.right) != null && xppr.red) {
xppr.red = false;
xp.red = false;
xpp.red = true;
x = xpp;
}
// 如果xpp的右节点是空或者为黑色的话
else {
// 如果x是xp的右节点,那么左旋xp节点,并且重新更新xp和xpp
if (x == xp.right) {
root = rotateLeft(root, x = xp);
xpp = (xp = x.parent) == null ? null : xp.parent;
}
// 如果x的父节点不为空,先把它设为黑色
if (xp != null) {
xp.red = false;
// 如果xp的父节点不为空,则先把xpp设为红色,然后再右旋
if (xpp != null) {
xpp.red = true;
root = rotateRight(root, xpp);
}
}
}
}
// 如果xp为xp父节点的右右节点
else {
// 如果xpp的左节点非空并且是红色的话,把xppl设为黑色,xp设为黑色,xp的父节点设为红色
if (xppl != null && xppl.red) {
xppl.red = false;
xp.red = false;
xpp.red = true;
x = xpp;
}
// 如果xpp的左节点是空或者是黑色的话
else {
if (x == xp.left) {
root = rotateRight(root, x = xp);
xpp = (xp = x.parent) == null ? null : xp.parent;
}
// 如果x为父节点的左节点,则右旋xp节点,并重新设置xp,xpp
if (xp != null) {
xp.red = false;
if (xpp != null) {
xpp.red = true;
root = rotateLeft(root, xpp);
}
}
}
}
}
}
/**
* 修复红黑树,返回新的根结点
* @param root 根结点
* @param x 从这个结点开始向上修复红黑树
*/
static <K,V> TreeNode<K,V> balanceDeletion(TreeNode<K,V> root,
TreeNode<K,V> x) {
for (TreeNode<K,V> xp, xpl, xpr;;) {
// 情况1:如果x为空或根结点
if (x == null || x == root)
return root;
// 情况2:如果x的父结点为空
else if ((xp = x.parent) == null) {
x.red = false;
return x;
}
// 情况3:如果x为红色结点,则涂黑
else if (x.red) {
x.red = false;
return root;
}
// 情况4:如果x是父结点的左孩子
else if ((xpl = xp.left) == x) {
// 情况4.1:x的兄弟结点不为空且为红色结点
if ((xpr = xp.right) != null && xpr.red) {
xpr.red = false;
xp.red = true;
root = rotateLeft(root, xp);
xpr = (xp = x.parent) == null ? null : xp.right;
}
// 情况4.2:x的兄弟结点为空
if (xpr == null)
x = xp;
// 情况4.3:x的兄弟结点不为空且为黑色结点
else {
TreeNode<K,V> sl = xpr.left, sr = xpr.right;
// 情况4.3.1:x的兄弟结点左右孩子均不为红色结点
if ((sr == null || !sr.red) &&
(sl == null || !sl.red)) {
xpr.red = true;
x = xp;
}
// 情况4.3.2:x的兄弟结点左右孩子至少有一个是红色结点
else {
// x兄弟结点的右孩子为空或者是黑色结点
if (sr == null || !sr.red) {
if (sl != null)
sl.red = false;
xpr.red = true;
root = rotateRight(root, xpr);
xpr = (xp = x.parent) == null ?
null : xp.right;
}
if (xpr != null) {
xpr.red = (xp == null) ? false : xp.red;
if ((sr = xpr.right) != null)
sr.red = false;
}
if (xp != null) {
xp.red = false;
root = rotateLeft(root, xp);
}
x = root;
}
}
}
// 情况5:如果x是父结点的右孩子
else { // symmetric
// 情况5.1:x的兄弟结点不为空且为红色结点
if (xpl != null && xpl.red) {
xpl.red = false;
xp.red = true;
root = rotateRight(root, xp);
xpl = (xp = x.parent) == null ? null : xp.left;
}
// 情况5.2:x的兄弟结点为空
if (xpl == null)
x = xp;
// 情况5.3:x的兄弟结点不为空且为黑色结点
else {
TreeNode<K,V> sl = xpl.left, sr = xpl.right;
// 情况5.3.1:x的兄弟结点左右孩子均不为红色结点
if ((sl == null || !sl.red) &&
(sr == null || !sr.red)) {
xpl.red = true;
x = xp;
}
else {
// 情况5.3.2:x的兄弟结点左右孩子至少有一个是红色结点
if (sl == null || !sl.red) {
if (sr != null)
sr.red = false;
xpl.red = true;
root = rotateLeft(root, xpl);
xpl = (xp = x.parent) == null ?
null : xp.left;
}
if (xpl != null) {
xpl.red = (xp == null) ? false : xp.red;
if ((sl = xpl.left) != null)
sl.red = false;
}
if (xp != null) {
xp.red = false;
root = rotateRight(root, xp);
}
x = root;
}
}
}
}
}
/**
* 检查此时的红黑树是否符合红黑树的性质
* 如果不符合,程序会抛出AssertionError,并终止执行
* 一般从根结点开始,采用递归的方式检查每一个结点
* @param t 从该结点开始检查
*/
static <K,V> boolean checkInvariants(TreeNode<K,V> t) {
TreeNode<K,V> tp = t.parent, tl = t.left, tr = t.right,
tb = t.prev, tn = (TreeNode<K,V>)t.next;
// t的前驱结点不为空,并且它的后继节点不为t
if (tb != null && tb.next != t)
return false;
// t的后继结点不为空,并且它的前驱节点不为t
if (tn != null && tn.prev != t)
return false;
// t的父结点不为空,并且它的左右孩子都不是t(相当于认了个干爹)
if (tp != null && t != tp.left && t != tp.right)
return false;
// t的左孩子不为空,与此同时,它的父结点不是t或者它的哈希值大于t的哈希值
if (tl != null && (tl.parent != t || tl.hash > t.hash))
return false;
// t的右孩子不为空,与此同时,它的父结点不是t或者它的哈希值小于t的哈希值
if (tr != null && (tr.parent != t || tr.hash < t.hash))
return false;
// t、t的左孩子、t的右孩子都不为空且都是红色结点
if (t.red && tl != null && tl.red && tr != null && tr.red)
return false;
// 如果t的左孩子不为空,则继续从左孩子开始检查
if (tl != null && !checkInvariants(tl))
return false;
// 如果t的右孩子不为空,则继续从右孩子开始检查
if (tr != null && !checkInvariants(tr))
return false;
return true;
}
}
二. HashMap中hash冲突的解决(Rehash)
JDK8中的HashMap相对JDK7中的HashMap做了些优化
首先,有一个问题:假如我们现在有一个容量为16的数组,现在我想往里面放对象,我有16个对象, 怎么放进去呢?
其实要解决一个问题就够了:对象要放在哪个下标?当然最简单的方法是从0下标开始一个一个挨着往后放
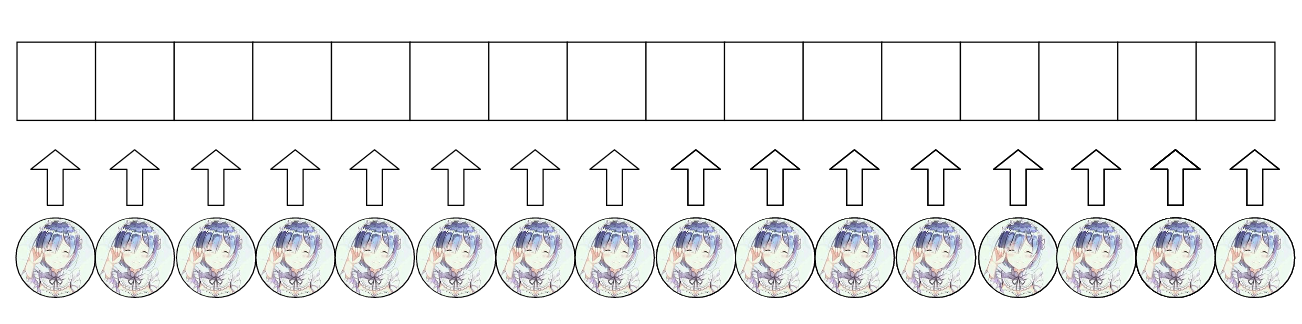
这样就把你们的对象放满整个数组了,一个位置也没有浪费~
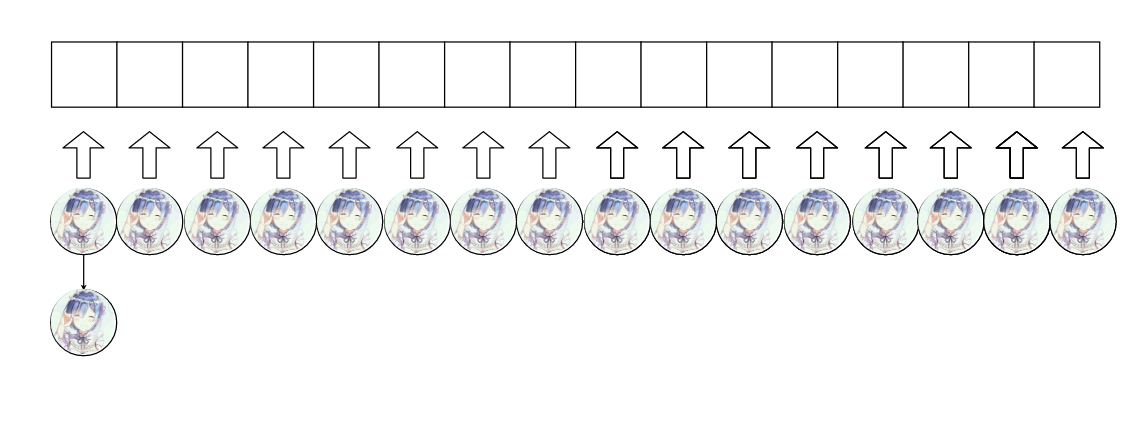
但是有17个对象呢?
无论无何必须有两个对象在同一个槽位(槽位指的是数组中某个下标的空间)了,如果不扩充数组的大小的话
那我们采取的策略最简单的是像上面一样先塞满数组,最后一个对象随机放到一个位置,用链表的形式把他挂在数组中某个位置的对象上
(较新版本的JDK中 如果链表太长会变成树)
但是如果现在我们有20个对象呢???50个对象呢???100个,1000个对象呢???
每个槽位需要承受的对象数量会越来越多,如果只是一味地挂对象,而不采取合适的策略确定要加上去的对象到底放在哪个位置的话,很有可能出现下面这种状况
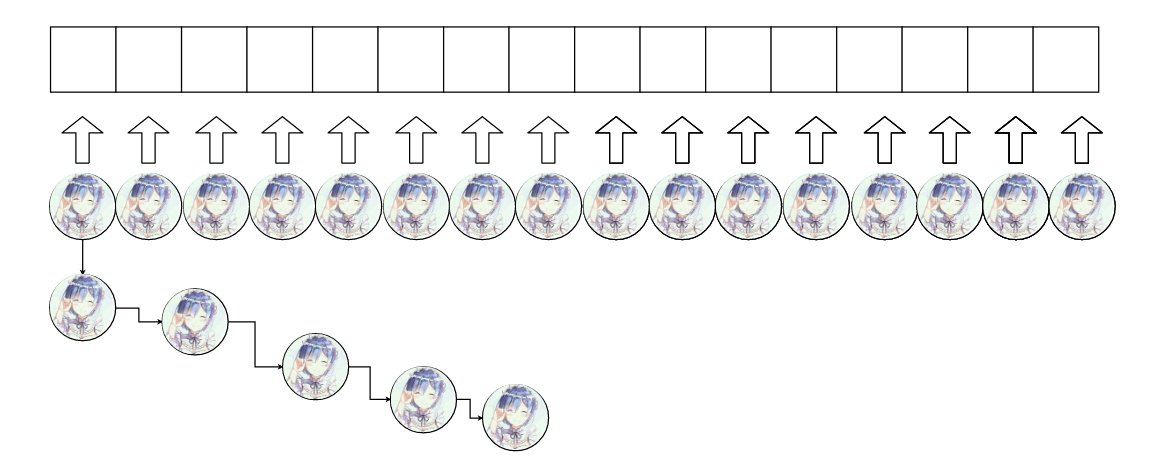
那么当我们查找一个对象的时候可能遇到这种情况,
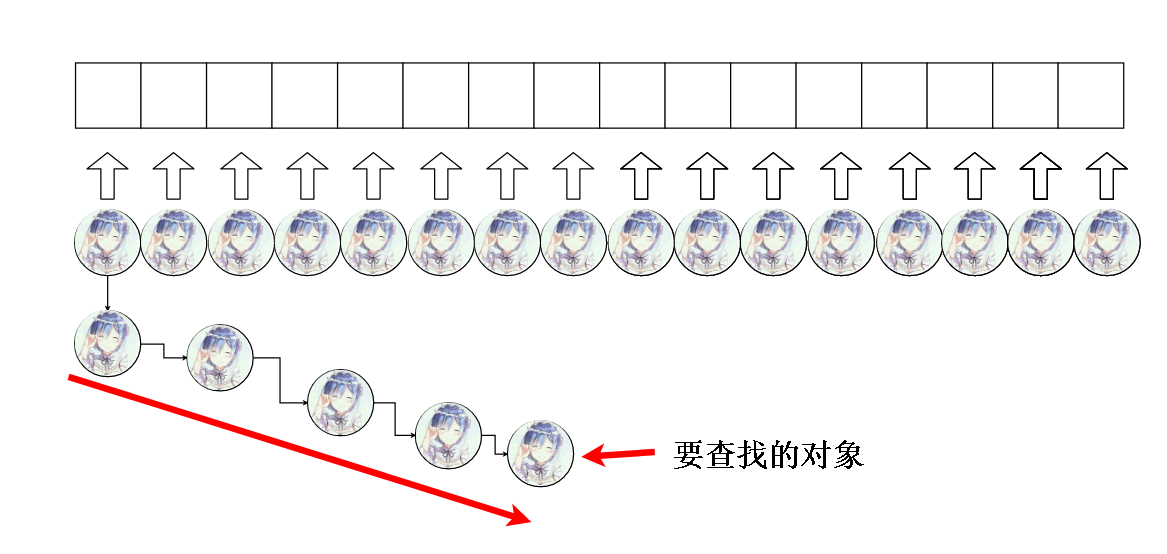
这样的话,查询时间复杂度为线性, 效率十分低下,我们希望加上去的对象在整个数组上呈均匀分布的趋势,这样就不会出现某个槽承受了很多对象但是有的槽位承受很少对象,甚至只有一个对象的情况
下面是我们希望的结果。

因为要查询的话最多查两次就能查到我们想要的对象了。
这样我们就不得不决定,要加入的对象在数组的下标了!
怎么确定下标呢?有一种确定下标的方法,这种确定下标的方法(算法)叫做散列
散列的过程就是通过对象的特征,确定他应该放在哪个下标的过程
那这个特征是什么呢???哈希码!(hashCode的翻译)
java每个对象都有一个叫”hashCode”的标签码 和他对应,当然这个hashCode不一定是唯一的
小贴士:
在HashMap的源码中调用了key.hashCode()来获得hashCode,请注意,因为实际调用到的是运行时对象所属类的方法
比如类A继承了类Object,A重写了Object的hashCode()方法,Object ob = new A(); ,ob.hashCode();调用的实际是类A重写后的hashCode方法
所以我们可以通过重写 hashCode() 方法来返回我们想要的hashCode值
所以不同对象的hashCode 可能是一样的,取决于类怎么重写hashCode()
我们的问题可以简化为,怎么把我们的hashCode映射到下标的二进制码上呢?
现在假设我们的 hashCode 是8位的 (实际上是32位的),比如下面就是一个对象a 的hashCode
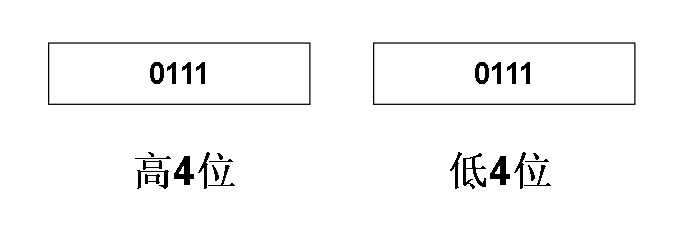
假如我们的数组大小是16,那么我们要根据hashCode 确定好数组下标,下标的范围是0~15.
该怎么确定呢?我们可以用直接映射的方法
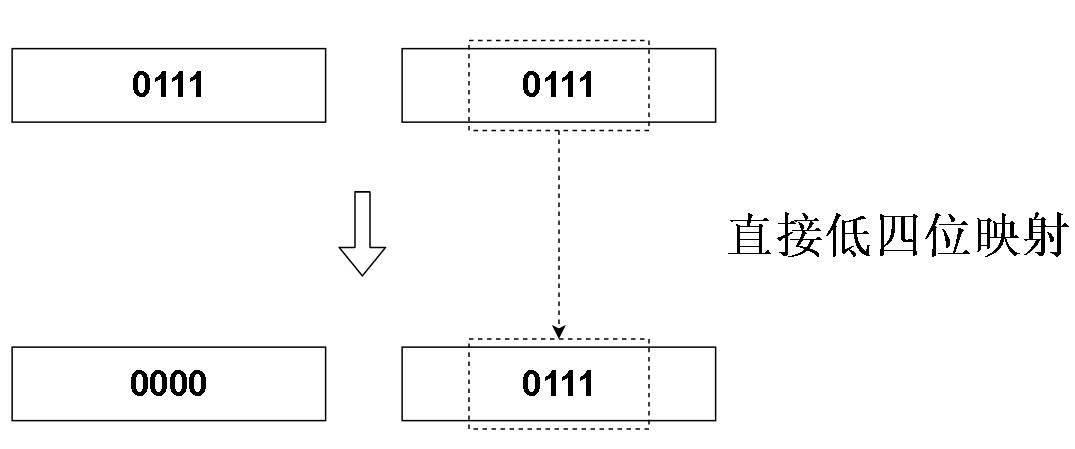
我们发现,把hashCode 的二进制码直接映射到数组下标的二进制码上,直接把高位全部置为0
而且因为我们用低四位去映射,所以范围会保持在0~15间,所以最后映射的结果总是没有超出范围
这样的话,上图的hashCode 的数组下标就是 7( 1 + 2 + 4 = 7, 0111的十进制=7)
但是,进一步观察,我们发现,无论高位怎么样,只要低位相同,都会映射到同一个数组下标上:
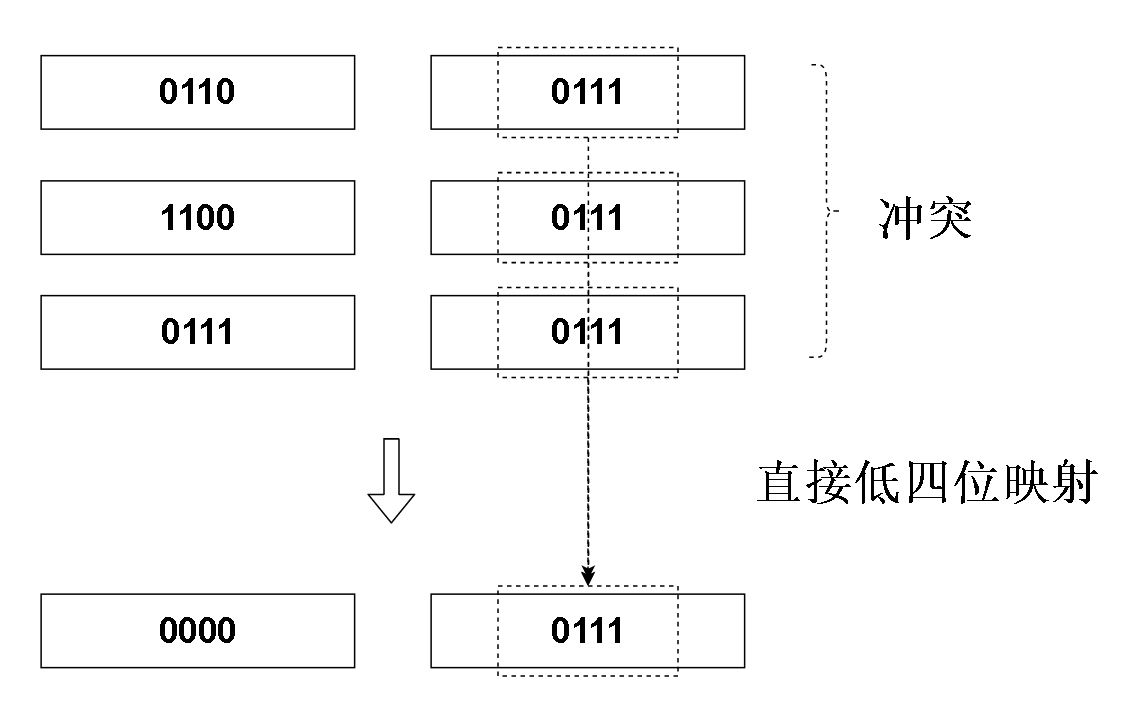
高位有 2 ^ 4 = 16 种情况,这16种情况都会瞄准同一个数组下标,何况实际上我们的hashCode是32位的,这样的话就有 2 ^ (32 - 4) = 2 ^ 28 种冲突
出现了我们之前担心的场景,许多甚至所有对象组成一条链表挂在一个位置上,这样查询效率十分低下。
这种对不同对象进行散列,但是最后得到的下标相同的情况称为hash冲突,也可以称为散列冲突,其实散列就是hash翻译过来的。
我们来看看JDK8中的HashMap是怎么解决这种冲突的
首先我们要知道,JDK8是怎么执行散列的
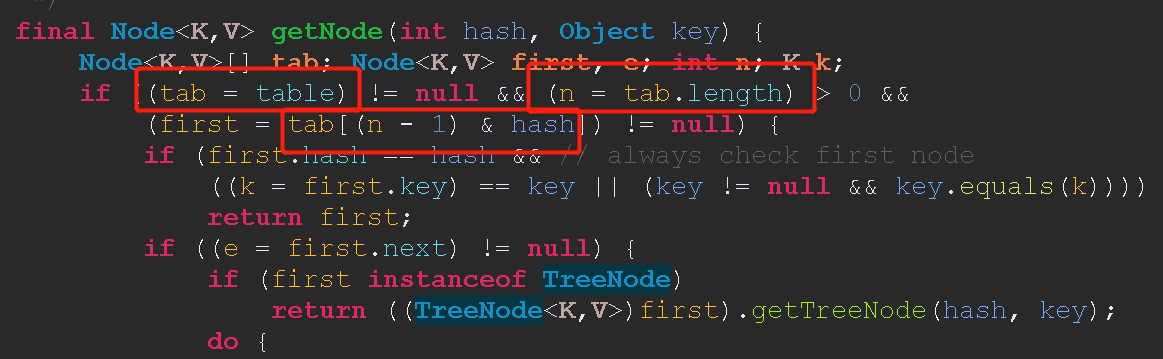
JDK8使用了掩码,即是下文注释中将提到的用来masking的数值
这个掩码是根据HashMap存储对象的数组的大小决定的,图中table就是我们所说的hash表,n - 1 被作为掩码和 传进来的hash值(也就是hashCode)
进行 & 运算:
看下面一个例子更明了一点:
比如大小为 32 的hash表
32的二进制数是 0010 0000
那么32 - 1 = 31 就是 0001 1111
0001 1111 & A 会得到什么呢,0001 1111 像一块掩布一样,将和他 & 的数 A 的前三位都遮住,全部变成0,其他位不变,所以被称为掩码。
比如 A = 1101 0101
因为我们的掩码前三位全是0 那么他就会把A的前三位全部掩盖掉,掩码后面的1,和A对应位 & 之后保持不变
现在再来看看官方源码的hashCode是怎么减少冲突的。
来看hash 方法上的一段注解, hash方法是把hashCode再散列一次,把散列hashCode后的值作为返回值返回,以此再次减少冲突,而过程是把高位的特征性传到低位。
每个 [] 中的内容都是对前面一小段的解释,如果嫌麻烦可以直接读解释,不读英文
/**
    * Computes key.hashCode() and spreads (XORs) higher bits of hash
    * to lower.  Because the table uses power-of-two masking, sets of
    * hashes that vary only in bits above the current mask will
    * always collide. (Among known examples are sets of Float keys
    * holding consecutive whole numbers in small tables.)
    * So we apply a transform that spreads the impact of higher bits
    * downward. There is a tradeoff between speed, utility, and
    * quality of bit-spreading. Because many common sets of hashes
    * are already reasonably distributed (so don't benefit from
    * spreading), and because we use trees to handle large sets of
    * collisions in bins, we just XOR some shifted bits in the
    * cheapest possible way to reduce systematic lossage, as well as
    * to incorporate impact of the highest bits that would otherwise
    * never be used in index calculations because of table bounds.
    */
hash再散列方法
计算key.hashCode()[计算得出hashCode 不属于这个hash函数管]把高位二进制序列(比如 0110 0111 中的 0110) , 的特征性传播到低位中,通过异或运算实现
因为HashMap存储对象的数组容量经常是2的次方,这个二的次方(比如上面是16 = 2 ^ 4) 减1后作为掩码
在掩码是2^n - 1 的情况下,只用低位的话经常发生hash冲突
(经典的例子是: 一组在小表中保存连续的浮点数key)
所以我们应用一个转换,将高位的影响向下传播
但是这种特性的传播会带来一定的性能损失(速度、实用性和位传播质量之间权衡)
因为有的hashCode他们的低位已经足够避免多数hash冲突了(已经被合理的均匀分布了, 他们在位传播的过程中不会受益)
[比如我们的hashCode是八位的并且我们的数组大小是((2 ^ 8) - 1) (0111 1111) ]
[那么只有两种冲突情况而已,0mmm mmmm 和 1mmm mmmm 会冲突,每次进行插入元素或者查找元素都要调用hash函数再一次散列hashCode,显然不划算]
因为我们使用树来处理容器中的大量冲突,所以我们只是以最节省的方式对一些移位的位进行异或运算,以减少系统损失
并合并最高位的影响,否则由于表边界的原因,最高位永远不会用于索引计算
static final int hash(Object key) {
        int h;
        return (key == null) ? 0 : (h = key.hashCode()) ^ (h >>> 16);
}
什么意思呢?什么叫做把高位的特征也用上?
比如我们之前说的。当我们有一个大小为16的数组,下面是两个对象的hashCode
0110 0111
1100 0111
如果我们直接用这两个未经hash函数处理的hashCode 通过JDK的方法得出下标:

n = 16
16 = 0001 0000
16 - 1 = 15 = 0000 1111
hash(这是上图蓝字变量) = hashCode(未经hash函数再散列)
0110 0111 & 0000 1111 = 0000 0111 —— 7
1100 0111 & 0000 1111 = 0000 0111 —— 7
求得同一个下标,显然冲突了,就算两个hashCode他们的高位不同,但还是会冲突
现在我们用上高位的特性,
static final int hash(Object key) {
        int h;
        return (key == null) ? 0 : (h = key.hashCode()) ^ (h >>> 16);
}
因为本来hashCode是32位的,所以上面 >>> 的是16,也就是高一半的位移到低一半去
而我们设置的hashCode 是8位的,所以上面的 >>> 的应该是 4
hash (上面蓝字变量) = hash (hashCode) —— hash函数对hashCode 再散列
对应过程如下图
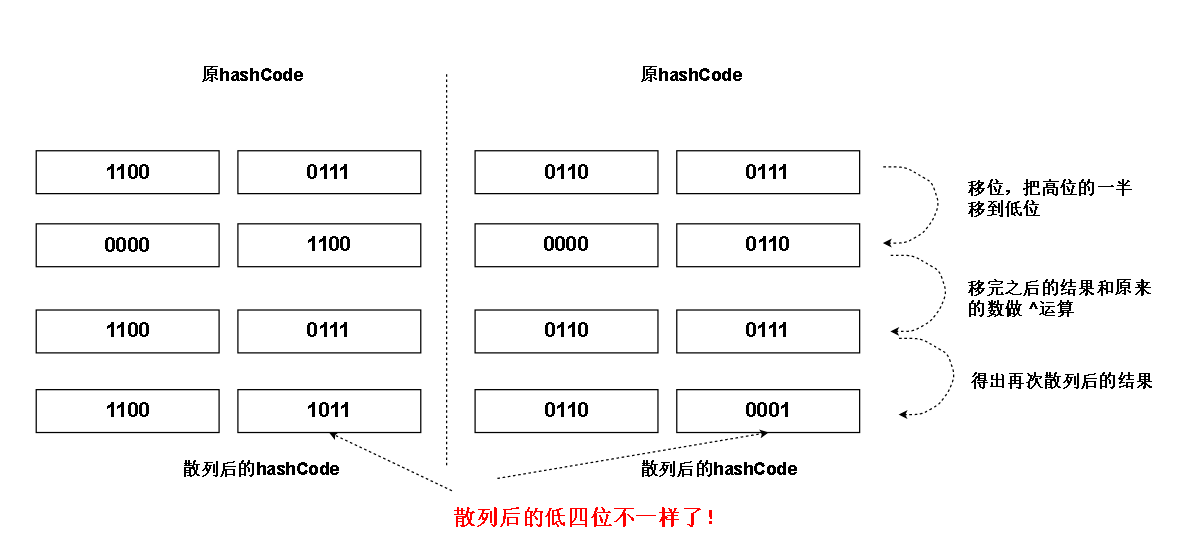
正如我们所见,原本冲突的低四位,把高位的特征传到他们上面后,他们不冲突了!
当我们对这些再散列后的结果用掩码掩掉不必要的高位之后(见上面的红框框图)(比如高四位),剩下的是
0000 1011
0000 0001
对应的数组下标是 11 和 1
解决了冲突!
三. HashMap遍历方式(整表遍历, 子列表遍历, 并发遍历)
全表遍历
遍历键值对
- 第一步:根据entrySet()获取HashMap的“键值对”的Set集合
- 第二步:通过Iterator迭代器遍历“第一步”得到的集合
Set<Map.Entry<Integer, String>> entrySet = map.entrySet();
for (Map.Entry<Integer, String> integerStringEntry : entrySet) {
    System.out.println("Key: " + ((Map.Entry) integerStringEntry).getKey() + ", " + "Value" + ((Map.Entry) integerStringEntry).getValue());
}
备注: map.entrySet()方法获取到的是一个包括所有Map.Entry对象的Set
遍历键
- 第一步:根据keySet()获取HashMap的“键”的Set集合
- 第二步:通过Iterator迭代器遍历“第一步”得到的集合
Set<Integer> entrySet = map.keySet();
for (Integer integerStringEntry : entrySet)
    System.out.println("Key: " + integerStringEntry);
备注: map.keySet()方法获取到的是一个包括所有Key泛型类型的对象的Set
遍历值
- 第一步:根据value()获取HashMap的“值”的集合
- 第二步:通过Iterator迭代器遍历“第一步”得到的集合
Collection<String> values = map.values();
for (String str : values) {
    System.out.println("Value: "  + str);
}
备注: map.values()获取到的是一个包括所有value泛型类型的对象的Collection(允许重复)
遍历测试程序如下:
/**
 * 遍历HashMap的测试程序。
 * (01) 通过entrySet()去遍历key、value,参考实现函数:
 *     iteratorHashMapByEntryset()
 * (02) 通过keySet()去遍历key、value,参考实现函数:
 *     iteratorHashMapByKeyset()
 * (03) 通过values()去遍历value,参考实现函数:
 *     iteratorHashMapJustValues()
 *
 * @author zk
 */
public class HashMapIteratorTest {

    public static void main(String[] args) {
        int val;
        String key;
        Integer value;
        Random r = new Random();
        HashMap<String, Integer> map = new HashMap<>(20);

        for (int i = 0; i < 12; i++) {
            // 随机获取一个[0,100)之间的数字
            val = r.nextInt(100);

            key = String.valueOf(val);
            value = r.nextInt(5);
            // 添加到HashMap中
            map.put(key, value);
            System.out.println(" key:" + key + " value:" + value);
        }
        // 通过entrySet()遍历HashMap的key-value
        iteratorHashMapByEntryset(map);

        // 通过keySet()遍历HashMap的key-value
        iteratorHashMapByKeyset(map);

        // 单单遍历HashMap的value
        iteratorHashMapJustValues(map);
    }

    /**
     * 通过entry set遍历HashMap
     * 效率高!
     */
    private static void iteratorHashMapByEntryset(HashMap map) {
        if (map == null) {
            return;
        }

        System.out.println("\niterator HashMap By entryset");
        String key;
        Integer integ;
        Iterator iter = map.entrySet().iterator();
        while (iter.hasNext()) {
            Map.Entry entry = (Map.Entry) iter.next();

            key = (String) entry.getKey();
            integ = (Integer) entry.getValue();
            System.out.println(key + " -- " + integ);
        }
    }

    /**
     * 通过keyset来遍历HashMap
     * 效率低!
     */
    private static void iteratorHashMapByKeyset(HashMap map) {
        if (map == null) {
            return;
        }

        System.out.println("\niterator HashMap By keyset");
        String key;
        Integer integ;
        Iterator iter = map.keySet().iterator();
        while (iter.hasNext()) {
            key = (String) iter.next();
            integ = (Integer) map.get(key);
            System.out.println(key + " -- " + integ);
        }
    }


    /**
     * 遍历HashMap的values
     */
    private static void iteratorHashMapJustValues(HashMap map) {
        if (map == null) {
            return;
        }

        Collection c = map.values();
        Iterator iter = c.iterator();
        while (iter.hasNext()) {
            System.out.println(iter.next());
        }
    }
}
小贴士: 阿里巴巴开发规范中提到, 如果需要遍历k-v对, 一定使用entrySet()方法获取Entry遍历
使用keySet()遍历map的效率较低
并发遍历
在JDK 8之后加入了Spliterator接口帮助进行并发遍历, map中有KeySpliterator, ValueSpliterator和EntrySpliterator都继承自内部抽象类HashMapSpliterator并实现了Spliterator接口, 因此可以通过这三个内部类获取相应的Spliterator来完成并发遍历HashMap
例: 创建一个长度为100的list,如果下标能被10整除,则该位置数值跟下标相同,否则值为aaaa。然后多线程遍历list,取出list中的数值(字符串aaaa不要)进行累加求和
public class Test {

    static HashMap<Integer, String> map;

    static AtomicInteger count;

    public static void main(String[] args) throws InterruptedException {
        // 初始化List, 并获得spliterator
        map = new HashMap<>();
        for (int i = 1; i <= 109; i++) {
            if (i % 10 == 0) {
                map.put(i, Integer.toString(i));
            } else {
                map.put(i, "aaaa");
            }
        }
        Spliterator<String> spliterator = map.values().spliterator();

        // 求和结果
        count = new AtomicInteger(0);

        Spliterator<String> s1 = spliterator.trySplit();
        Spliterator<String> s2 = s1.trySplit();

        Thread main = new Thread(new Task(spliterator));
        Thread t1 = new Thread(new Task(s1));
        Thread t2 = new Thread(new Task(s2));

        main.start();
        t1.start();
        t2.start();

        t1.join();
        t2.join();
        main.join();

        System.out.println(count);
    }

    // 判断字符串是数字
    public static boolean isInteger(String str) {
        Pattern pattern = Pattern.compile("^[-+]?[\\d]*$");
        return pattern.matcher(str).matches();
    }

    static class Task implements Runnable {

        private Spliterator<String> spliterator;

        public Task(Spliterator<String> spliterator) {
            this.spliterator = spliterator;
        }

        @Override
        public void run() {
            String threadName = Thread.currentThread().getName();
            System.out.println("线程" + threadName + "开始运行-----");
            spliterator.forEachRemaining(x -> {
                if (isInteger(x)) {
                    count.addAndGet(Integer.parseInt(x));
                    System.out.println("数值:" + x + "------" + threadName);
                }
            });
            System.out.println("线程" + threadName + "运行结束-----");
        }
    }
}

------- Output -------
线程Thread-1开始运行-----
线程Thread-2开始运行-----
线程Thread-0开始运行-----
线程Thread-0运行结束-----
数值:10------Thread-2
数值:20------Thread-2
数值:30------Thread-2
数值:40------Thread-2
数值:50------Thread-2
数值:60------Thread-2
线程Thread-2运行结束-----
数值:70------Thread-1
数值:80------Thread-1
数值:90------Thread-1
数值:100------Thread-1
线程Thread-1运行结束-----
550
注: HashMap的遍历和ArrayList有很大的不同!
由于HashMap中的遍历涉及到桶(存储分区数目)以及树(或者链表)结构, 且和具体数据的hash值也有很大的关系
所以可能会出现像上例中Thread-0类似: 做了切分但实际上没有分配任何数据!
HashMap由于结构十分复杂, 以后有机会再研究内部的并发实现