前面讲解了线程池的原理, 而线程池任务的存储采用的是阻塞队列(需要的话要通过构造方法传入一个阻塞队列). 所以本篇介绍Java中的阻塞队列
在JUC包中,BlockingQueue很好的解决了多线程中,如何高效安全“传输”数据的问题, 通过这些高效并且线程安全的队列类,为我们快速搭建高质量的多线程程序带来极大的便利
本文详细介绍了BlockingQueue家庭中的所有成员,包括他们各自的功能以及常见使用场景
本文内容包括:
初识阻塞队列
阻塞队列的成员
阻塞队列原理及使用
DelayQueue
ArrayBlockingQueue
LinkedBlockingQueue
文章转自: Java 阻塞队列–BlockingQueue
零.什么是阻塞队列? 阻塞队列(BlockingQueue)是一个支持两个附加操作的队列 , 这两个附加的操作是:
在队列为空时,获取元素的线程会等待队列变为非空
当队列满时,存储元素的线程会等待队列可用
因此阻塞队列常用于生产者和消费者的场景: 生产者是往队列里添加元素的线程,消费者是从队列里拿元素的线程;
而阻塞队列就是生产者存放元素的容器,而消费者也只从容器里拿元素
阻塞队列提供了四种处理方法:
方法\处理方式 抛出异常 返回特殊值 一直阻塞 超时退出
插入方法 add(e)
offer(e)
put(e)
offer(e,time,unit)
移除方法 remove()
poll()
take()
poll(time,unit)
检查方法 element()
peek()
不可用
不可用
异常:
当阻塞队列满时候,再往队列里插入元素,会抛IllegalStateException(“Queue full”)异常;
当队列为空时,从队列里获取元素时会抛出NoSuchElementException异常
返回特殊值:
插入方法会返回是否成功,成功则返回true;
移除方法,则是从队列里拿出一个元素,如果没有则返回null
一直阻塞:
当阻塞队列满时,如果生产者线程往队列里put元素,队列会一直阻塞生产者线程 ,直到拿到数据,或者响应中断退出;
当队列空时,消费者线程试图从队列里take元素,队列也会阻塞消费者线程, 直到队列可用
超时退出:
当阻塞队列满时,队列会阻塞生产者线程一段时间,如果超过一定的时间,生产者线程就会退出;
一.初识阻塞队列 BlockingQueue的核心方法:
1
2
3
4
5
6
7
8
9
10
11
12
13
14
15
16
17
18
19
20
21
22
23
24
25
26
27
28
29
30
31
32
33
34
35
36
37
38
39
40
public interface BlockingQueue <E> extends Queue <E> { boolean add (E e) ; boolean offer (E e) ; void put (E e) throws InterruptedException; boolean offer (E e, long timeout, TimeUnit unit) throws InterruptedException; E take () throws InterruptedException; E poll (long timeout, TimeUnit unit) throws InterruptedException; int remainingCapacity () ; boolean remove (Object o) ; public boolean contains (Object o) ; int drainTo (Collection<? super E> c) ; int drainTo (Collection<? super E> c, int maxElements) ; }
在深入之前先回顾一下ReentrantLock 和 Condition:
可重入锁ReentrantLock:
ReentrantLock锁在同一个时间点只能被一个线程锁持有;而可重入的意思是,ReentrantLock锁,可以被单个线程多次获取
ReentrantLock分为“公平锁”和“非公平锁”。它们的区别体现在获取锁的机制上是否公平。
锁是为了保护竞争资源,防止多个线程同时操作线程而出错,ReentrantLock在同一个时间点只能被一个线程获取(当某线程获取到“锁”时,其它线程就必须等待);
ReentraantLock是通过一个FIFO的等待队列来管理获取该锁所有线程的 。在“公平锁”的机制下,线程依次排队获取锁;而“非公平锁”在锁是可获取状态时,不管自己是不是在队列的开头都会获取锁
主要方法:
lock()获得锁
lockInterruptibly()获得锁,但优先响应中断
tryLock()尝试获得锁,成功返回true,否则false,该方法不等待,立即返回
tryLock(long time,TimeUnit unit)在给定时间内尝试获得锁
unlock()释放锁
Condition
await()、signal()方法分别对应之前的Object的wait()和notify()
和重入锁一起使用
await()是当前线程等待同时释放锁 awaitUninterruptibly()不会在等待过程中响应中断 signal()用于唤醒一个在等待的线程,还有对应的singalAll()方法
二.阻塞队列的成员
队列 有界性 锁 数据结构
ArrayBlockingQueue bounded(有界)
加锁
arrayList
LinkedBlockingQueue optionally-bounded
加锁
linkedList
PriorityBlockingQueue unbounded
加锁
heap
DelayQueue unbounded
加锁
heap
SynchronousQueue bounded
加锁
无
LinkedTransferQueue unbounded
加锁
heap
LinkedBlockingDeque unbounded
无锁
heap
下面分别简单介绍一下:
① ArrayBlockingQueue
是一个用数组实现的有界阻塞队列,此队列按照先进先出(FIFO)的原则对元素进行排序
支持公平锁和非公平锁
② LinkedBlockingQueue
一个由链表结构组成的有界队列,此队列的长度为Integer.MAX_VALUE
此队列按照先进先出的顺序进行排序
③ PriorityBlockingQueue
一个支持线程优先级排序的无界队列,默认自然序进行排序,也可以自定义实现compareTo()方法来指定元素排序规则
不能保证同优先级元素的顺序(不稳定排序)
④ DelayQueue
一个实现PriorityBlockingQueue实现延迟获取的无界队列,在创建元素时,可以指定多久才能从队列中获取当前元素, 只有延时期满后才能从队列中获取元素
DelayQueue可以运用在以下应用场景:
缓存系统的设计: 可以用DelayQueue保存缓存元素的有效期,使用一个线程循环查询DelayQueue,一旦能从DelayQueue中获取元素时,表示缓存有效期到了 定时任务调度: 使用DelayQueue保存当天将会执行的任务和执行时间,一旦从DelayQueue中获取到任务就开始执行,从比如TimerQueue就是使用DelayQueue实现的
⑤ SynchronousQueue
一个不存储元素的阻塞队列,每一个put操作必须等待take操作,否则不能添加元素
支持公平锁和非公平锁
SynchronousQueue的一个使用场景是在线程池里:
Executors.newCachedThreadPool()就使用了SynchronousQueue,这个线程池根据需要(新任务到来时)创建新的线程,如果有空闲线程则会重复使用,线程空闲了60秒后会被回收
⑥ LinkedTransferQueue
一个由链表结构组成的无界阻塞队列 ,相比于其它队列,LinkedTransferQueue队列多了transfer和tryTransfer方法
⑦ LinkedBlockingDeque
一个由链表结构组成的双向阻塞队列
队列头部和尾部都可以添加和移除元素,多线程并发时,可以将锁的竞争最多降到一半
接下来重点介绍下:ArrayBlockingQueue、LinkedBlockingQueue以及DelayQueue
三.阻塞队列原理以及使用 1.DelayQueue DelayQueue的泛型参数需要实现Delayed接口,Delayed接口继承了Comparable接口,DelayQueue内部使用非线程安全的优先队列(PriorityQueue)
并使用Leader/Followers模式,最小化不必要的等待时间
DelayQueue不允许包含null元素
Leader/Followers模式:
上图就是L/F多线程模型的状态变迁图,共6个关键点:
(1)线程有3种状态:领导leading,处理processing,追随following
(2) 假设共N个线程: 其中只有1个leading线程(等待任务),x个processing线程(处理),余下有N-1-x个following线程(空闲)
(3)只有一把锁,谁抢到就是leading
(4) 事件/任务来到时,leading线程会对其进行处理,从而转化为processing状态,处理完成之后,又转变为following
(5)丢失leading后,following会尝试抢锁,抢到则变为leading,否则保持following
(6)following不干事,就是抢锁,力图成为leading
这种方法可以增强CPU高速缓存相似性,及消除动态内存分配和线程间的数据交换
优点:不需要消息队列
适用场景:线程能够很快的完成工作任务
有人说并发量大时,L/F的锁容易成为系统瓶颈,需要引入一个消息队列解决
此观点不对,一个消息队列,其仍是临界资源,仍需要一把锁来保证互斥,只是锁竞争从leading移到了消息队列上,此时消息队列仅仅只能起到消息缓冲的作用
根本解决方案是降低锁粒度 (例如多个队列)
① 属性以及构造函数
1 2 3 4 5 6 7 8 9 10 11 12 13 14 15 16 17 private final transient ReentrantLock lock = new ReentrantLock ();private final PriorityQueue <E> q = new PriorityQueue <E>();private Thread leader = null ;private final Condition available = lock.newCondition();public DelayQueue () {}public DelayQueue (Collection<? extends E> c) { this .addAll(c); }
② offer()方法
1
2
3
4
5
6
7
8
9
10
11
12
13
14
15
16
17
18
19
20
21
22
23
24
public boolean offer (E e) { final ReentrantLock lock = this .lock; lock.lock(); try { q.offer(e); if (q.peek() == e) { leader = null ; available.signal(); } return true ; } finally { lock.unlock(); } } public boolean offer (E e, long timeout, TimeUnit unit) { return offer(e); }
③ 普通的poll()方法
如果延迟时间没有耗尽的话(此时不应该能够获取),直接返回null
1
2
3
4
5
6
7
8
9
10
11
12
13
public E poll () { final ReentrantLock lock = this .lock; lock.lock(); try { E first = q.peek(); if (first == null || first.getDelay(TimeUnit.NANOSECONDS) > 0 ) return null ; else return q.poll(); } finally { lock.unlock(); } }
④ take()方法
1
2
3
4
5
6
7
8
9
10
11
12
13
14
15
16
17
18
19
20
21
22
23
24
25
26
27
28
29
30
31
32
33
34
35
36
37
38
39
40
41
42
43
public E take () throws InterruptedException { final ReentrantLock lock = this .lock; lock.lockInterruptibly(); try { for (;;) { E first = q.peek(); if (first == null ) available.await(); else { long delay = first.getDelay(TimeUnit.NANOSECONDS); if (delay <= 0 ) return q.poll(); else if (leader != null ) available.await(); else { Thread thisThread = Thread.currentThread(); leader = thisThread; try { available.awaitNanos(delay); } finally { if (leader == thisThread) leader = null ; } } } } } finally { if (leader == null && q.peek() != null ) available.signal(); lock.unlock(); } }
⑤ 带有timeout的poll方法
1
2
3
4
5
6
7
8
9
10
11
12
13
14
15
16
17
18
19
20
21
22
23
24
25
26
27
28
29
30
31
32
33
34
35
36
37
38
39
40
41
42
43
44
public E poll (long timeout, TimeUnit unit) throws InterruptedException { long nanos = unit.toNanos(timeout); final ReentrantLock lock = this .lock; lock.lockInterruptibly(); try { for (;;) { E first = q.peek(); if (first == null ) { if (nanos <= 0 ) return null ; else nanos = available.awaitNanos(nanos); } else { long delay = first.getDelay(TimeUnit.NANOSECONDS); if (delay <= 0 ) return q.poll(); if (nanos <= 0 ) return null ; if (nanos < delay || leader != null ) nanos = available.awaitNanos(nanos); else { Thread thisThread = Thread.currentThread(); leader = thisThread; try { long timeLeft = available.awaitNanos(delay); nanos -= delay - timeLeft; } finally { if (leader == thisThread) leader = null ; } } } } } finally { if (leader == null && q.peek() != null ) available.signal(); lock.unlock(); } }
2.ArrayBlockingQueue ① 参数以及构造函数
1 2 3 4 5 6 7 8 9 10 11 12 13 14 15 16 17 18 19 20 21 22 23 24 25 26 27 28 29 30 31 32 33 34 35 36 37 38 39 40 41 42 43 44 45 46 47 48 49 50 51 52 53 54 55 56 57 58 59 60 61 final Object[] items;int takeIndex;int putIndex;int count;final ReentrantLock lock;private final Condition notEmpty;private final Condition notFull;public ArrayBlockingQueue (int capacity) { this (capacity, false ); } public ArrayBlockingQueue (int capacity, boolean fair) { if (capacity <= 0 ) throw new IllegalArgumentException (); this .items = new Object [capacity]; lock = new ReentrantLock (fair); notEmpty = lock.newCondition(); notFull = lock.newCondition(); } public ArrayBlockingQueue (int capacity, boolean fair, Collection<? extends E> c) { this (capacity, fair); final ReentrantLock lock = this .lock; lock.lock(); try { int i = 0 ; try { for (E e : c) { checkNotNull(e); items[i++] = e; } } catch (ArrayIndexOutOfBoundsException ex) { throw new IllegalArgumentException (); } count = i; putIndex = (i == capacity) ? 0 : i; } finally { lock.unlock(); } }
② 添加的实现原理
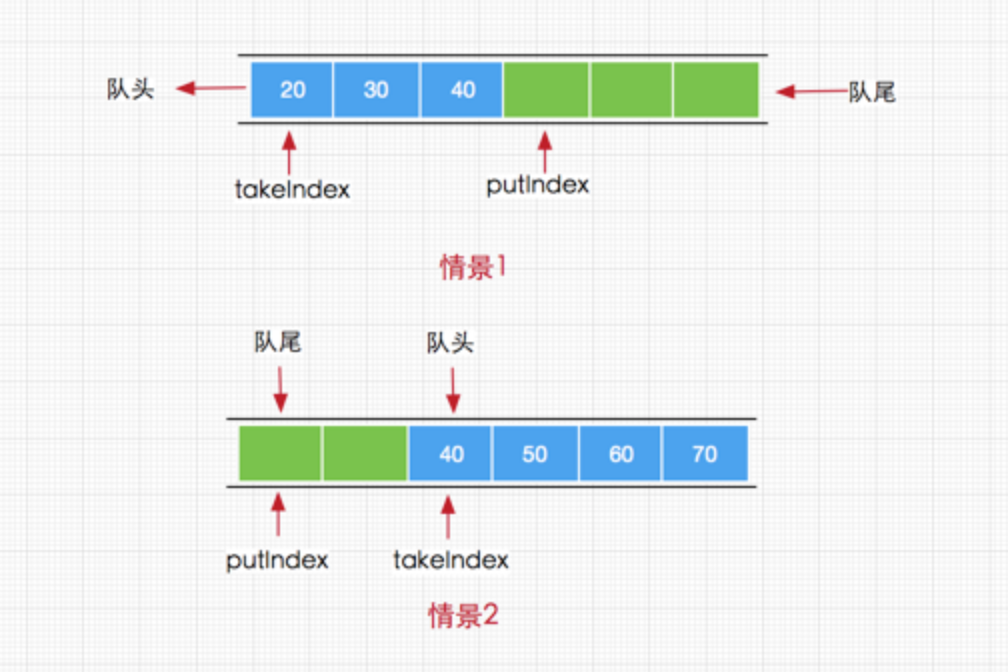
队列是由循环数组实现的, 所以有以下两个场景:
add方法和offer方法最终调用的是enqueue(E x)方法,其方法内部通过putIndex索引直接将元素添加到数组items中
这里可能会疑惑的是: 当putIndex索引大小等于数组长度时,需要将putIndex重新设置为0
这是因为当前队列执行元素获取时总是从队列头部获取,而添加元素从中从队列尾部获取所以当队列索引(从0开始)与数组长度相等时,下次我们就需要从数组头部开始添加(循环数组)
1 2 3 4 5 6 7 8 9 10 11 private void enqueue (E x) { final Object [] items = this .items; items[putIndex] = x; if (++putIndex == items.length) putIndex = 0 ; count++; notEmpty.signal(); }
接着看put方法:
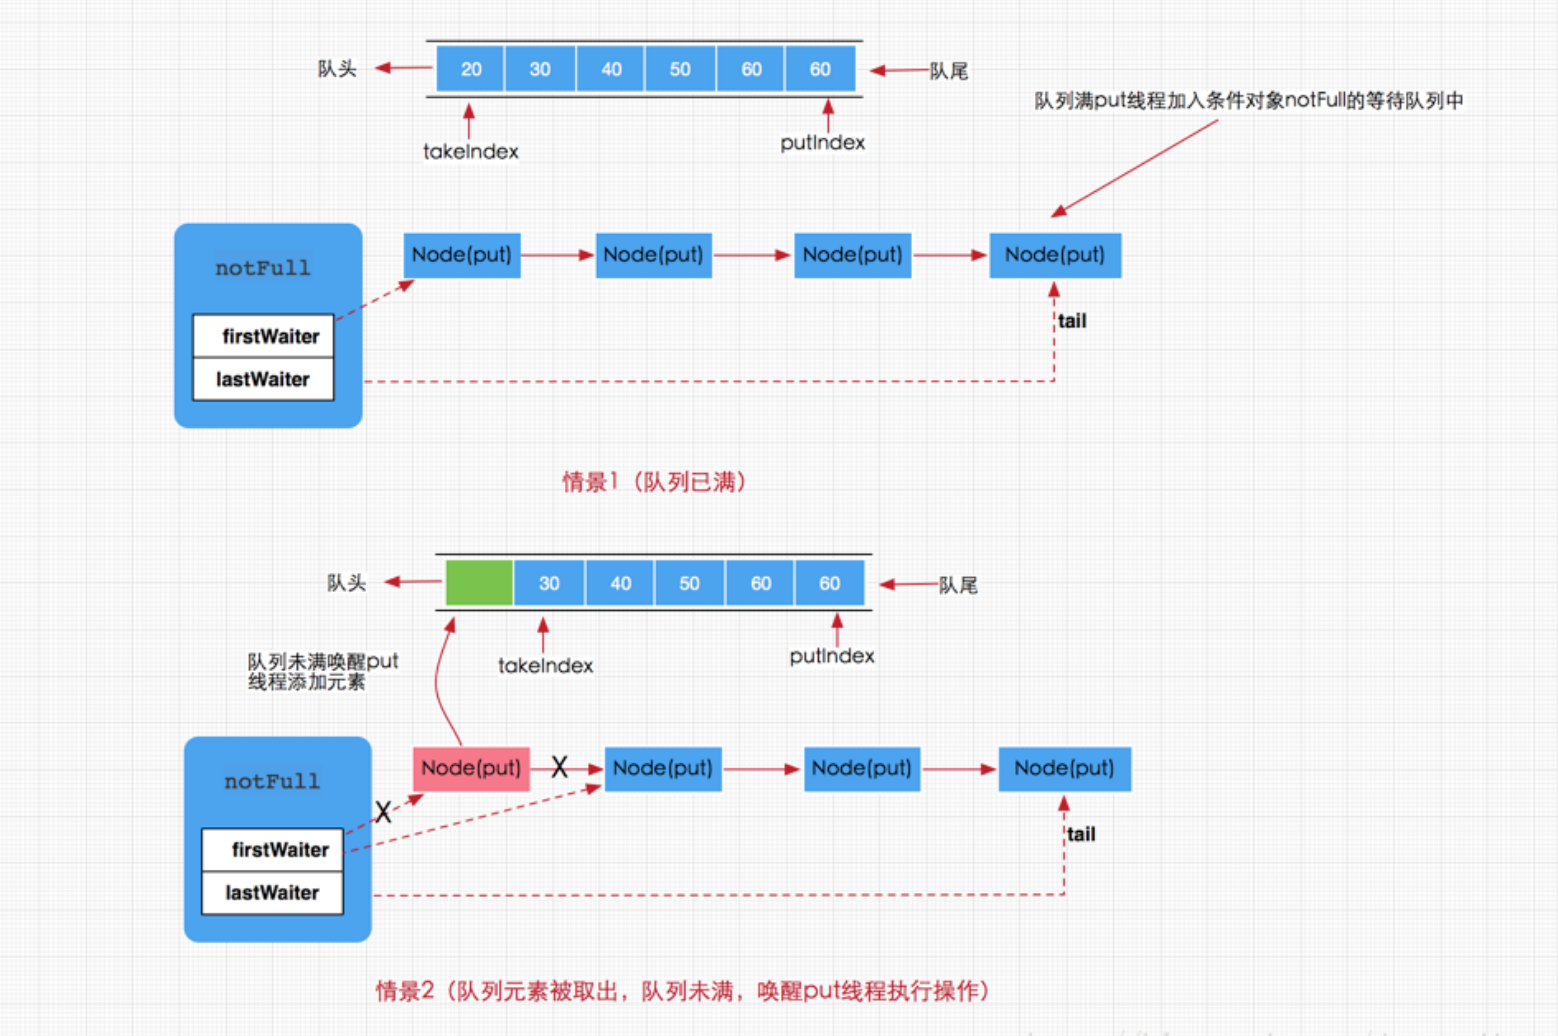
put方法是一个阻塞的方法 : 如果队列元素已满,那么当前线程将会被notFull条件对象挂起加到等待队列中,直到队列有空档才会唤醒执行添加操作
但如果队列没有满,那么就直接调用enqueue(e)方法将元素加入到数组队列中
这就是阻塞队列的添加过程, 说白了就是:
当队列满时通过条件对象Condtion来阻塞当前调用put方法的线程,直到线程又再次被唤醒执行
总得来说添加线程的执行存在以下两种情况:
队列已满,那么新到来的put线程将添加到notFull的条件队列中等待 有移除线程执行移除操作,移除成功同时唤醒put线程,如下图所示;
1
2
3
4
5
6
7
8
9
10
11
12
13
14
public void put (E e) throws InterruptedException { checkNotNull(e); final ReentrantLock lock = this .lock; lock.lockInterruptibly(); try { while (count == items.length) notFull.await(); enqueue(e); } finally { lock.unlock(); } }
③ 移除实现原理
poll方法,该方法获取并移除此队列的头元素,若队列为空,则返回 null
1
2
3
4
5
6
7
8
9
10
11
12
13
14
15
16
17
18
19
20
21
22
23
24
25
26
27
28
29
30
31
32
33
public E poll () { final ReentrantLock lock = this .lock; lock.lock(); try { return (count == 0 ) ? null : dequeue(); } finally { lock.unlock(); } } private E dequeue () { final Object [] items = this .items; @SuppressWarnings("unchecked") E x = (E) items[takeIndex]; 将数组中takeIndex索引位置设置为null items[takeIndex] = null ; if (++takeIndex == items.length) takeIndex = 0 ; count--; if (itrs != null ) itrs.elementDequeued(); notFull.signal(); return x; }
接着看remove(Object o)方法:
1
2
3
4
5
6
7
8
9
10
11
12
13
14
15
16
17
18
19
20
21
22
23
24
25
26
27
28
29
30
31
32
33
34
35
36
37
38
39
40
41
42
43
44
45
46
47
48
49
50
51
52
53
54
55
56
57
58
59
60
61
62
63
64
65
66
67
68
69
70
71
72
73
74
75
public boolean remove (Object o) { if (o == null ) return false ; final Object [] items = this .items; final ReentrantLock lock = this .lock; lock.lock(); try { if (count > 0 ) { final int putIndex = this .putIndex; int i = takeIndex; do { if (o.equals(items[i])) { removeAt(i); return true ; } if (++i == items.length) i = 0 ; } while (i != putIndex); } return false ; } finally { lock.unlock(); } } void removeAt (final int removeIndex) { final Object [] items = this .items; if (removeIndex == takeIndex) { items[takeIndex] = null ; if (++takeIndex == items.length) takeIndex = 0 ; count--; if (itrs != null ) itrs.elementDequeued(); } else { final int putIndex = this .putIndex; for (int i = removeIndex;;) { int next = i + 1 ; if (next == items.length) next = 0 ; if (next != putIndex) { items[i] = items[next]; i = next; } else { items[i] = null ; this .putIndex = i; break ; } } count--; if (itrs != null ) itrs.removedAt(removeIndex); } notFull.signal(); }
remove(Object o)方法的删除过程相对复杂些,因为该方法并不是直接从队列头部删除元素
首先线程先获取锁,再一步判断队列count>0,这点是保证并发情况下删除操作安全执行
接着获取下一个要添加源的索引putIndex以及takeIndex索引 ,作为后续循环的结束判断,因为只要putIndex与takeIndex不相等就说明队列没有结束, 然后通过while循环找到要删除的元素索引,执行removeAt(i)方法删除
在removeAt(i)方法中实际上做了两件事:
首先判断队列头部元素是否为删除元素,如果是直接删除,并唤醒添加线程
如果要删除的元素并不是队列头元素,那么执行循环操作,从要删除元素的索引removeIndex之后的元素都往前移动一个位置,那么要删除的元素就被removeIndex之后的元素替换,从而也就完成了删除操作
接着看take()方法
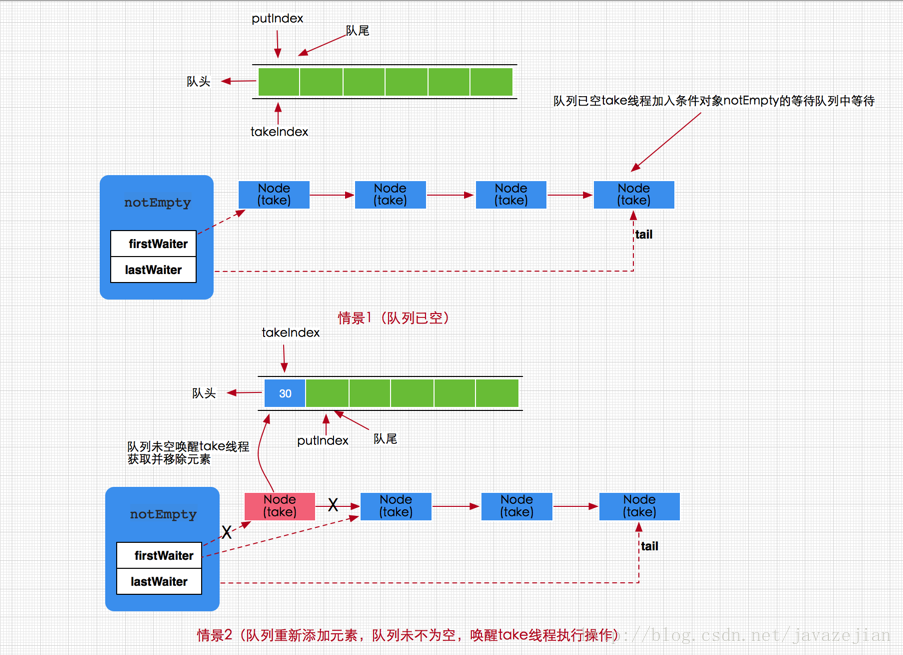
take方法其实很简单: 有就删除没有就阻塞,注意这个阻塞是可以中断的
如果队列没有数据那么就加入notEmpty条件队列等待(有数据就直接取走,方法结束),如果有新的put线程添加了数据,那么put操作将会唤醒take线程,执行take操作
图示如下
1 2 3 4 5 6 7 8 9 10 11 12 13 14 15 public E take () throws InterruptedException { final ReentrantLock lock = this .lock; lock.lockInterruptibly(); try { while (count == 0 ) notEmpty.await(); return dequeue(); } finally { lock.unlock(); } }
最后看看peek()方法,比较简单,直接返回当前队列的头元素但不删除任何元素
1
2
3
4
5
6
7
8
9
10
11
12
13
14
public E peek () { final ReentrantLock lock = this .lock; lock.lock(); try { return itemAt(takeIndex); } finally { lock.unlock(); } } final E itemAt (int i) { return (E) items[i]; }
3.LinkedBlockingQueue ① 参数以及构造函数
1 2 3 4 5 6 7 8 9 10 11 12 13 14 15 16 17 18 19 20 21 22 23 24 25 26 27 28 29 30 31 32 33 34 35 36 37 38 39 40 41 42 43 44 45 46 47 48 49 50 51 52 53 54 55 56 57 58 59 60 static class Node <E> { E item; Node<E> next; Node(E x) { item = x; } } private final int capacity;private final AtomicInteger count = new AtomicInteger (0 );private transient Node<E> head;private transient Node<E> last;private final ReentrantLock takeLock = new ReentrantLock ();private final Condition notEmpty = takeLock.newCondition();private final ReentrantLock putLock = new ReentrantLock ();private final Condition notFull = putLock.newCondition();public LinkedBlockingQueue () { this (Integer.MAX_VALUE); } public LinkedBlockingQueue (int capacity) { if (capacity <= 0 ) throw new IllegalArgumentException (); this .capacity = capacity; last = head = new Node <E>(null ); } public LinkedBlockingQueue (Collection<? extends E> c) { this (Integer.MAX_VALUE); final ReentrantLock putLock = this .putLock; putLock.lock(); try { int n = 0 ; for (E e : c) { if (e == null ) throw new NullPointerException (); if (n == capacity) throw new IllegalStateException ("Queue full" ); enqueue(new Node <E>(e)); ++n; } count.set(n); } finally { putLock.unlock(); } }
其他方法与ArrayBlockingQueue类似, 这里不再赘述
附录 文章转自: Java 阻塞队列–BlockingQueue
如果觉得文章写的不错, 可以关注微信公众号: Coder张小凯
内容和博客同步更新~